Working with Audio
Audio tracks can be imported into or recorded directly in Tahoma2D. Basic editing to the track can be done in the Timeline or Xsheet.
Lip-sync files generated from Papagayo or Magpie can be applied to a level to sync the drawing order with an audio track. Tahoma2D also includes Rhubarb Lip-Sync, which can analyze an audio track and automatically sync the drawing order in a level with the audio.
Recording an Audio Track
Audio clips can be recorded directly in Tahoma. They will save in the WAV format.
Click in an empty cell, where the audio track should start
In the menu, go to Panels and then Record Audio
Choose the microphone and then press the red record button
Note
On macOS, the first time recording, a dialog will pop-up asking for permission to use the microphone. Permission must be granted before any recording can begin. After granting permission, recording begins immediately.
Press the stop button (white square) to stop the recording
Press the play button (white triangle) to preview the track
Press Save and Insert to save the track and expose it in the Timeline (or record again to replace the take)
Note
Keep the Sync with Scene checkbox checked to see the scene play as the audio is recorded
Creating a Soundtrack
Audio clips can be loaded and edited in order to create a soundtrack for the scene; natively supported file formats are non-compressed WAV and AIFF files at 8 and 16 bit. Since FFmpeg is bundled with Tahoma, MP3 audio files can be loaded too. There is no limit to the number of audio clips that can be loaded in a scene.
Note
Audio files with 32 bit encoding are not currently supported. While they partially load, they only display as a single frame and will not actually be usable.
To load an audio clip you can use the “Load Level” command found both in the Level menu and in the context menu for cells in the Timeline. Audio clips can also be loaded through the Browser room; if an audio clip is imported, it is saved in the +extras folder (see Using the File Browser ). Loaded audio clips are also stored in the Audio folder of the Scene Cast.
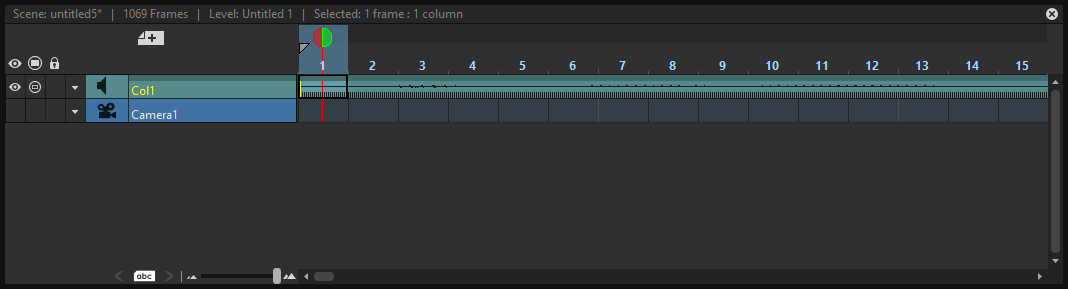
Each loaded audio clip is exposed in a different Timeline layer as a series of visible sound waves to make the editing job easier; the number of frames it spans depends on the length of the audio file and the frame rate set for the current scene. For example an audio clip 3 seconds long, imported into a scene whose frame rate is 12, will occupy 36 frames; if imported in a scene whose frame rate is 24 will occupy 72 frames (see Setting the Frame Rate ).
Audio columns/layers can be edited the way you edit any other column/layer. Its header contains the following information about the content:
Name, by default is the number of the column/layer the audio is exposed in. e.g. Col5.
Render toggle (
 ) allowing you to include or not the audio column/layer content in the rendering.
Camera stand toggle (
 ) allowing you to include or not the column/layer content when scrubbing the audio with the current frame cursor (see below).
Lock toggle (
 ) allowing you to prevent any editing in the column/layer.
Additional settings button (
 ) allowing you to set the volume.
Loudspeaker icon that lets you play the contents back.
The Level Settings dialog is available for audio clips as well, allowing you to check the location of the related file, or to update the loading path to a different location, or to a different file (see Editing Level Settings ).
The soundtrack you define with audio clips will be created by merging all of the contents of audio columns/layers according to the volume you set for each of them. While it cannot be played back when using the playback controls in the viewer, it can be scrubbed with the current frame cursor in the Xsheet frame column, the Timeline frame ruler or in the viewer framebar, and played back when a scene is previewed (see Editing Audio Clips and Previewing the Animation ).
When a scene is rendered in a file format supporting audio, (MP4, MOV, WebM or AVI), the soundtrack will be included in the file (see Rendering the Animation ).
Note
Audio clips loaded in Subscenes will not be included in the output soundtrack (see Using Subscenes ).
Note
As the soundtrack cannot be played back when viewing files in the Tahoma2D flipbook, you can activate the Use Default Viewer for Movie Formats option in the Preferences → General dialog, in order to view files with their own default viewer, e.g. QuickTime for the MOV format, thus playing back the soundtrack as well.
Tip
To play the contents of an audio column/layer back:
Click the loudspeaker icon available in the header of the column/layer. Click it again to stop the playback.
Tip
To set the volume of an audio column/layer:
Click the Additional settings button () and use the Volume slider in there.
Tip
To include or exclude an audio when scrubbing the audio with the current frame cursor
Click the Camera stand toggle () on the column/layer header. If you right-click the toggle you can select commands from a menu that opens that let you affect several columns/layers at the same time.
Tip
To include or exclude the audio column/layer contents from the rendering:
Click the Render toggle () on the column/layer header. If you right-click the toggle you can select commands from a menu that opens that let you affect several columns/layers at the same time.
Tip
To lock or unlock a column/layer contents:
Click the Lock toggle () on the column/layer header. If you right-click the toggle you can select commands from a menu that opens that let you lock or unlock several columns/layers at the same time.
Editing Audio Clips
Once loaded, audio clips can be moved up and down in a Xsheet column, left and right in a Timeline layer, or to a different column/layer, in order to be played starting from a certain frame of the animation. They can be trimmed to select a part of the whole clip and edited, by deleting or copying some sections, using standard edit commands the same way you use them on standard levels.
When a clip is trimmed, the trimmed part is not eliminated, but hidden, and it has a colored horizontal marker at its starting or ending, according to where it was trimmed: it is possible to retrieve the trimmed part by moving back the markers.
When a clip is split into sections by deleting, cutting or moving operations, it is automatically duplicated and trimmed to create the right result.
Note
Audio clips can be moved and pasted only to empty columns/layers, or to other audio columns/layers.
Note
All the editing does not affect the file on disk, as it refers only to the way the clip is used in the scene.
To find a particular section in an audio file, you can examine it by scrubbing it with the current frame cursor, either in the Xsheet frame column, the Timeline frame ruler, in the viewer framebar, or by selecting any section and automatically playing it back together with the animation. This allows you to easily spot and excerpt the sections you need from an audio file.
Tip
To select audio clips:
Do one of the following:
Click and drag to select a section of the clip.
Shift-click a clip cell to extend the selection up to that cell.
In the Xsheet, click the vertical strip available on the left of the clip, to select the whole clip.
In the Timeline, click the horizontal strip available on the top of the clip, to select the whole clip.
Tip
To edit audio clips with the Edit menu commands:
You can do the following:
Use the Copy command to keep in memory the selection for further operations.
Use the Cut command to eliminate the selection from the Xsheet/Timeline and keep it in memory for further operations. The cell elimination causes the following cells to shift up in the Xsheet or left in the Timeline.
Use the Paste command to paste the selection kept in memory in the Xsheet/Timeline, starting from the selected insertion cell. The command causes the following cells to shift down in the Xsheet or right in the Timeline.
Use the Delete command to empty the selected cells from any reference.
Use the Insert command to insert blank cells before the selection; inserted cells will be as many as the selected ones.
Note
All the Edit menu commands are also available in the menu that opens when right-clicking the Xsheet/Timeline cells.
Note
Toggling the Camera stand toggle off/on updates the audio playback after making changes to the audio level’s cells.
Tip
To move a clip selection in the Xsheet:
Do one of the following:
Click the vertical strip available on the left of the clip cells, and drag them to move them to a new position.
Ctrl-click (PC) or Cmd-click (Mac) the vertical strip available on the left of the clip cells, and drag them to the new position duplicating them.
Shift-click the vertical strip available on the left of the clip cells, and drag them to the new position inserting them if other audio clips are loaded in the destination cells.
Alt-click the vertical strip available on the left of the clip cells, and drag them to the new position overwriting any other audio clips previously loaded in the destination cells.
Tip
To move a clip selection in the Timeline:
Do one of the following:
Click the horizontal strip available on the top of the clip cells, and drag them to move them to a new position.
Ctrl-click (PC) or Cmd-click (Mac) the horizontal strip available on the top of the clip cells, and drag them to the new position duplicating them.
Shift-click the horizontal strip available on the top of the clip cells, and drag them to the new position inserting them if other audio clips are loaded in the destination cells.
Alt-click the horizontal strip available on the top of the clip cells, and drag them to the new position overwriting any other audio clips previously loaded in the destination cells.
Note
When it is not possible to release the selection, a red outline is displayed instead of the selection.
Note
Toggling the Camera stand toggle off/on updates the audio playback after rearranging the audio level’s cells.
Tip
To trim an audio clip:
Do any of the following:
Click the layer header so that the audio track is fully active
Click and drag the starting of a clip to trim its starting part.
Click and drag the ending of a clip to trim its ending part.
Click and drag the marker of a trimmed clip to redefine the trimmed part.
Tip
To scrub audio clips:
Do one of the following:
Drag the Xsheet frame cursor up or down to scrub all the audio columns whose Camera Stand toggle is active.
Drag the Timeline frame cursor left or right to scrub all the audio layers whose Camera Stand toggle is active.
Drag the frame cursor in the viewer framebar to scrub all the audio columns whose Camera Stand toggle is active.
Windows only: In the Xsheet, click and drag on the dashed vertical strip available on the right of the audio column cells, the selected section will be automatically played back.
Windows only: In the Timeline, click and drag on the dashed horizontal strip available on the bottom of the audio layer cells, the selected section will be automatically played back.
Lip Synching
When you need to synchronize the movement of a character’s lips with the sound of the speech, you can take advantage of the possibility to examine the audio files loaded in the scene.
Once you have created different mouth images, you can analyze the audio files to find where to place specific mouth drawings. If mouth drawings belong to one single animation level, you can quickly change the mouth drawing at a specific frame by picking drawings from the level strip or by flipping through drawings using one of the Skeleton tool features (see Using the Level Strip and Animating Models ).
The breakdown of audio files can be done by looking at the sound wave in the scene column, for example to spot where each word starts; by scrubbing the loaded audio clips with the current frame cursor either in the Xsheet/Timeline frame ruler or in the Viewer framebar; and by listening to specific sections of the audio files.
When mouth images are placed in the proper place, you can check the sync by scrubbing or selecting again the audio file section you are interested in, because while listening to the selected audio section, the viewer will display the related animation frames.
This technique can be used in any case you need the sound to be perfectly synchronized with the action, for example a character playing an instrument, or a scene based on the rhythm of a music.
Tip
To scrub audio clips:
Do one of the following:
Drag the Xsheet/Timeline frame cursor forward or backwards to scrub all the audio levels whose Camera Stand toggle is active.
Drag the frame cursor in the Viewer framebar to scrub all the audio columns whose Camera Stand toggle is active.
Windows only: click and drag on the dashed strip available on the audio level cells: the selected section will be automatically played back.
Tip
To flip through the mouth drawings:
Do one of the following:
Select in the Xsheet or Timeline the animation level containing the mouth drawings.
Right-click in the viewer over the mouth drawing you want to flip through, and choose the Select command related to the column/layer containing the drawing you clicked.
Choose the Skeleton tool (
) and set the tool mode to Animate.
In the viewer click the label with the level name on the right of the current section pivot point and flip through following and previous frames by doing one of the following:
Drag up or down.
Click the up or down arrowheads.
Press the Drawing Substitution Backward and Drawing Substitution Forward hotkeys,
QandWrespectively.
Using Rhubarb Lip Sync for Automated Lip-Synching
Rhubarb Lip Sync is bundled with Tahoma2D, as of the 1.2 release. It analyzes audio tracks and automatically exposes the drawings for each phoneme to the corresponding frames for the audio track.
Load the audio track onto its own layer, if it is not already there (right-click on the cell the audio should begin and select “Load Level”)
Expose in the Xsheet/Timeline at least one drawing of the level containing the mouth shapes set.
Select the cell of the column/layer where you want the lip sync to start, and using the right-click menu, choose the Apply Lip Sync Data to Column option.
In the Lip Sync Dialog, in the From Audio tab, choose the correct audio track
Note
Press play to preview the track if needed
Note
Typing dialog in the audio script field is optional but increases the accuracy
Choose which level drawings to assign to each phoneme using the arrows below each phoneme
Note
Rhubarb utilizes its own phoneomes that have been interpreted as the Preston Blair phoneomes, without a unique phoneome for WQ
Click the “Apply” button
Note
If for some reason Rhubarb is missing, it can be downloaded and then the path to Rhubarb can be set in Preferences under 3rd Party Apps. The timeout for analyzing audio with Rhubarb can be set in the same place. By default, timeout is set to 0 seconds so there is no timeout.
Importing Papagayo-NG Files
It is possible to import into the Xsheet/Timeline DAT files exported from Papagayo-NG, a lip-sync and animation timing tool.

While Papagayo-NG takes care of the audio file analysis and phoneme recognition, importing the DAT file into Tahoma2D allows you to assign a frame from an animation level to each phoneme and automatically expose the result in an Xsheet column or Timeline layer; to be able to hear the synched sound, the correspondent sound level should be manually loaded too.
Tip
To export the Tahoma2D lip sync file in Papagayo-NG:
In Papagayo-NG, from the Export: dropdown menu, select MOHO.
Press the Export button, to export a .DAT file.
Tip
To import a Papagayo-NG file:
Expose in the Xsheet/Timeline at least one drawing of the level containing the mouth shapes set.
Select the cell of the column/layer where you want the lip sync to start, and using the right click menu choose the Apply Lip Sync Data to Column option.
In the Lip Sync Dialog, switch to the From Data File tab
Choose which level drawings to assign to each phoneme using the arrows below each phoneme
Use the Lip Sync Data File: browser to retrieve the DAT file you exported from Papagayo-NG, and click the Choose button.
The Insert at Frame: parameter should already be showing the frame number of the cell you previously selected. Still, you can change it to make the lip sync start at another frame.
Activate the Extend Rest Drawing to End Marker if you want to copy the Rest Drawing to all the remaining frames between the loaded lip sync ending, and the frame where the End Marker of the Xsheet/Timeline is set.
Click the Apply button.
Importing Magpie Files
It is possible to import into the Xsheet/Timeline .TLS files (i.e. Toonz Lip Sync) exported from Magpie, a lip-sync and animation timing tool.
While Magpie takes care of the audio file analysis and phoneme recognition, importing the .TLS file into Tahoma2D allows you to assign a frame from an animation level to each phoneme and automatically expose the result in an Xsheet column or Timeline layer; an additional column/layer displaying the speech text (as recognized in Magpie) is created for reference.
Tip
To export the Tahoma2D lip sync file in Magpie:
Copy the file
export-toonz.luaavailable intahomastuff\configfolder into theC:\Program Files (x86)\Third Wish Software & Animation\Magpie Pro\Scripts\Exportfolder.In Magpie choose File → Export and choose Toonz among the 2D software list to export the TLS file.
Tip
To import a Magpie file:
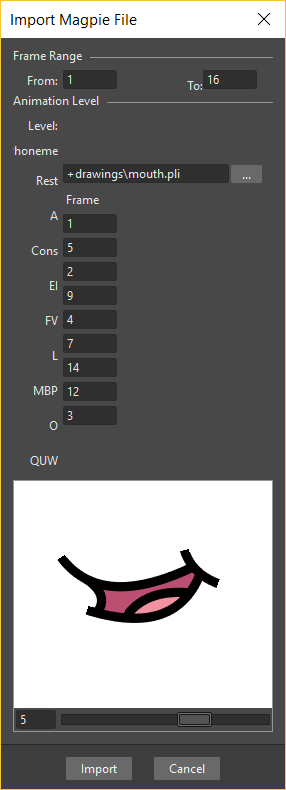
Choose File → Import Magpie File….
In the browser that opens retrieve the TLS file you exported from Magpie and click the Load button.
In the dialog that opens choose the following:
Use Frame Range to define which section of the Magpie file you want to use to create the lip sync column in the Xsheet/Timeline.
Use the Animation Level section to retrieve the animation level you want to expose in the Xsheet/Timeline, and to specify which frame of the level has to be assigned to each phoneme; you can also use the viewer available at the bottom of the dialog to examine the frames of the selected animation level.
Click the Import button.