Managing Projects
Projects are an easy way to manage scenes and files used in them. They allow you to organize your production material not only by defining default settings used throughout the production, but also default folders where files will be automatically saved, and from where they will be retrieved when needed. This means that, for example, as soon as you scan drawings, they will be saved automatically in the input default folders you specified for your project.
The main advantage of managing the production through projects, is that a consistency of production settings and production material can be achieved.
The consistency of production settings is achieved because all the scenes of a projects, as soon as they are created, inherit all the settings from the project (see Setting Up a Scene ).
The right use of production material is achieved because once you have defined a production structure through projects, all the scenes are able to save and retrieve files by using the project default folders.
Setting up Projects
Project information is stored in an XML file named tahomaproject, in the project directory.
Projects can be organized in folders and can contain sub-projects that can be browsed in the Tahoma2D file browser. This allows you to customize the project structures in order to follow your production needs, for instance creating a folder for each episode, then a project for each scene belonging to that episode. As the project browser will display the project tree and all the folders contained in the projectroot, you can also organize your folder structure in the projectroot by using the OS file system.
There is always one current project selected in the project browser: when you start working on a scene, automatically it will belong to the current project, inheriting its settings and default folders.
If you want a new scene to be part of a new project, first you have to define a new project. If you want it to be part of a previously created project, first you have to set that project as the current one.
Note
If you want to use the farm for rendering scenes, all the server (rendering) nodes of the farm have to share the same projectroot (see Installing the Toonz Farm on Windows ) and all the drives containing the projects database, have to be shared on the network.
Tip
To create a new project from the menu:
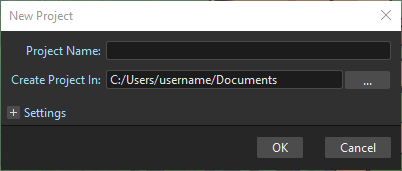
Choose File → Project Management → New Project.
Type the name of the project.
Click on … to choose a project location.
Click on the OK button.
Tip
To create a new project from the startup window:
Click on the New Project button.
Type a name for project.
Click on … to choose a project location.
Click on the OK button.
Note
Documents is the default project location.
Tip
To change the current project from the menu:
Choose File → Project Management → Switch Project.
Click on … then choose a different project.
Click on the OK button.
Tip
To change the current project from the browser:
Click the small round button on the left of the project name in the project tree available in the Tahoma2D file browser. It becomes red when selected.
Tip
To change the current project from the startup window:
Click on … next to the project name to choose a different project.
Note
Opening a scene in a different project will also change the active project.
Tip
To add a scene to a project from the menu:
Set the project as the current one.
Choose File → New Scene (Ctrl+N | Cmd+N).
Tip
To add a scene to the active project from the startup window:
Add a scene name.
Click on Create Scene.
Project Default Folders
Projects have default folders where scanned drawings, painted drawings, scenes, rendered frames and palettes are automatically saved. These folders are shared by all of the scenes created for that particular project, and are labelled in the following way:
+inputs is the folder where all scanned drawings are saved (as TIF files).
+drawings is the folder where Tahoma2D cleaned up drawings, drawings made directly in Tahoma2D and imported Tahoma2D drawings are saved (TLV and PLI files).
+scenes is the folder where the Tahoma2D scenes are saved (TNZ files).
+extras is the folder where all the imported non-Tahoma levels, images and audio files are saved.
+outputs is the folder where rendered images are saved.
+palettes is the folder where the project palettes of the studio palette are saved, and where the Raster Drawing Palette, shared by all the raster levels belonging to the project, is stored.
For each of these folders you can specify different locations on your computer network depending on the way you set up the storage of your production material.
Absolute or relative paths can be specified for the default folders definition.
If you specify an absolute path, the folders will be created, when needed, where specified. For example you can set +drawings to be C:\production\drawings01 on Windows, or /Volume/Macintosh HD/production/drawing01 on Macintosh: this means that the Tahoma2D drawn and cleaned up levels will be automatically saved in C:\production\drawings01 on Windows, or in /Volume/Macintosh HD/production/drawing01 on Macintosh.
If you specify a relative path, all the folders you specify in the path will be created, when needed, in the project folder under the selected projectroot or repository (see Configuring the Version Control in Tahoma2D ). For example, for the project myproject, you can set +drawings to be sequence01\mydrawings : this means that the Tahoma2D drawn and cleaned up levels will be automatically saved in the myproject\sequence01\mydrawings folder located in the selected projectroot or repository.
The $scenepath variable can also be used to automatically create specific folders according to the scene you are working on. The variable can be either appended to the specified paths, or used in the path definition.
The labels of the default folders you can find in the project settings (i.e. +drawings, +extras, etc.) can be used as aliases in Tahoma2D. For example if some material is retrieved from the extras default folder, its loading path will contain the alias +extras. They can be also used when you need to specify a saving path, for example in the Path field of the New Level dialog.
When in a scene you load material not located in the current project folders, you can choose whether to import files, that is to say copy them in the related project folders, or to create a link with the external file. The link is defined by an absolute path.
Note
Files loaded in a scene without importing can be imported later on at once by using the Collect Assets feature (see Collecting Assets ).
Note
All shared disks involved in the folder definitions, i.e. disks where production material has to be written and read, must be shared granting full permissions to any user, otherwise the exchange of files will not succeed. For Windows, disks must have a Share Permission set to Full Control for Everyone; for Macintosh, the sharing settings must allow any user to read from and write to disks.
Note
When no project is defined, the Tahoma stuff/sandbox project is used by default.
Tip
To set default folders for a new project:
Do one of the following:
Type the path to the folder you want to use as default.
Use the browser button on the right of each text field, to set the folder you want to use as default.
Adding Custom Default Folders
Besides the basic default folders you can also add your own default folders, and use the related aliases, by defining a TXT file named project_folders.txt in the Tahoma stuff\profiles folder. In this file you can also change the order of the folders already available to change the way they are listed in the project settings dialog.
The following is an example of a projectfolders.txt file:
where the +backgrounds and +3D aliases were added to the default ones.
Tip
To add more default folders to projects:
Open the
Tahoma stuff\profiles\project_folders.txtfile.List the default folders you want to define, one per line, and save the file.
Using the $scenepath Variable in Folder Definition
The $scenepath variable can also be used in the definition of the +inputs, +drawings, and +extras aliases when typing the default folder path. In this case the path where you save the current scene will replace the $scenepath variable in the path definition, with the needed folders automatically created during the saving process.
For example if +drawings is $scenepath\mydrawings, and you save the scene scene01 in +scenes\seq01 , Tahoma2D drawn or cleaned up levels for that scene will be saved in seq01\scene01\mydrawings ; when you save the scene scene02, in seq01\scene02\mydrawings ; and so on.
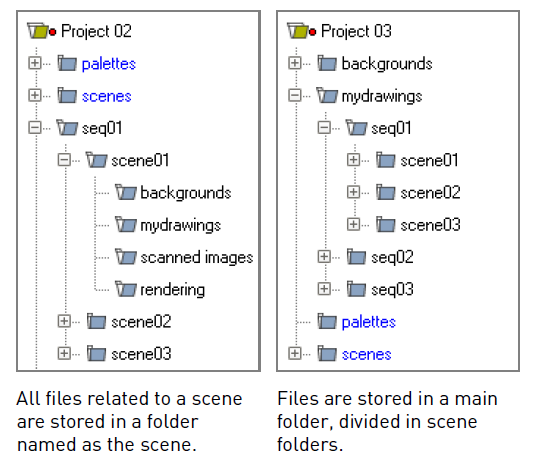
In this way the needed default folders are automatically created with the same given name (mydrawings), one for each scene, according to the path used when saving the scene. As a consequence, if the variable is used in this way for all the aliases, all the files related to a scene will be stored in a folder named as the scene.
A second example: if +drawings is mydrawings\$scenepath, when you save the scene scene01 in +scenes\seq01 , Tahoma2D drawn or cleaned up levels for that scene will be saved in mydrawings\seq01\scene01 ; when you save the scene scene02, in mydrawings\seq01\scene02 ; and so on.
In this case the needed default folders are automatically created with the name and path of folders used when saving the scene, inside the path specified (mydrawings). As a consequence, if the variable is used in this way for all the aliases, all the files used in the project will be stored in a main folder for each alias, whose content is divided into folders named as the scenes.
Note
The definition of the +palettes alias cannot include $scenepath, as the palettes refer to the whole project, not to specific scenes.
Note
It is not possible to use at the same time for an alias the $scenepath variable in folder definition and the Append $scenepath option.
Using the Append $scenepath Option
The Append $scenepath option is available for the +inputs, +drawings and +extras aliases. If you activate the Append $scenepath option for an alias, the path where you save the current scene will be added to the path of the alias, with the needed folders automatically created during the saving process.
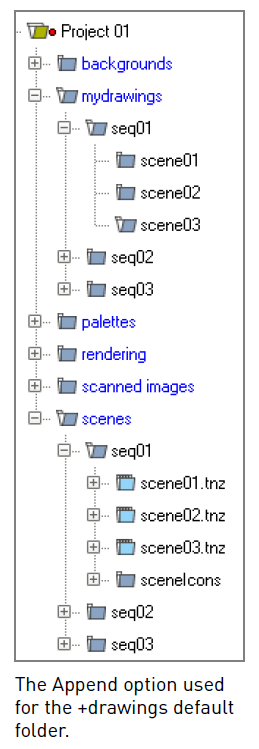
For example if +drawings is mydrawings , and you save the scene scene01 in +scenes\seq01 , Tahoma2D drawn or cleaned up levels for that scene will be saved in mydrawings\seq01\scene01 ; if you save the scene scene02 in +scenes\seq01 , Tahoma2D drawn or cleaned up levels for that scene will be saved in mydrawings\seq01\scene02 ; and so on.
This allows Tahoma2D to create scene-related folders automatically when saving Tahoma2D files or importing external files, while allowing the use of the generic aliases +drawings, +inputs and +extras, no matter where levels are loaded from within the current project.
Note
When a scene is saved in the +scenes folder, the value for $scenepath is the scene name; for example if you save the scene scene02 in +scenes, $scenepath will be scene02.
Note
It is not possible to use for an alias the Append $scenepath option and at the same time the $scenepath variable in defining the related folder.
Using the Project Browser
The project browser is available at the end of the file browser tree. It lists all of the projects that have been created, whose actual location is in the projectroot that was defined in the initial installation of Tahoma2D. The projectroot value is displayed in brackets.
The name of the folders which the aliases point to are displayed in blue.
Note
In case more than one projectroot is defined, each will be listed with the related projectroot value in brackets.
Default Folders with Relative Paths
When default folders are defined by using a relative path, in the project browser you will see all the folders specified in the path under the projectroot, and the project folders tree will be the same of the file system tree. The folders that are the target of the paths are displayed in blue.
For example, for the project Project01, with +drawings that is section01\prod drawings , the project browser will display the following:
- Projects
- Project01
- section01
prod drawings
If the option Append $scenepath is activated, and you save the scene scene01 in +scenes\seq01 , the project browser will display the following:
- Projects
- Project01
- section01
- prod drawings
- seq01
scene01
If the $scenepath is used in the folder definition, with +drawings that is $scenepath\prod drawings, and you save the scene scene01 in +scenes\seq01 , the project browser will display the following:
- Projects
- Project01
- seq01
- scene01
prod drawings
If the $scenepath is used in the folder definition, with +drawings that is mydrawings\$scenepath, and you save the scene scene01 in +scenes\seq01 , the project browser will display the following:
- Projects
- Project01
- prod drawings
- seq01
scene01
Default Folders with Absolute Paths
When default folders are defined by using an absolute path, in the project browser you will see only the related aliases, whatever their location on the network is. In this way you can quickly access the production material without browsing the computer, or the network. The aliases are displayed in blue, because they are the location the default folders paths point to.
For example, for the project Project01, with +drawings that is C:\production\prod drawings on Windows, or /Volume/Macintosh HD/production/prod drawings on Macintosh, the project browser will display the following:
- Projects
- Project01
+drawings
where +drawings is an alias for C:\production\prod drawings on Windows, or /Volume/Macintosh HD/production/prod drawings on Macintosh.
If the option Append $scenepath is activated, and you save the scene scene01 in +scenes\seq01 , the project browser will display the following:
- Projects
- Project01
- +drawings
- seq01
scene01
If the $scenepath is used in the folder definition, with +drawings that is C:\$scenepath\prod drawings on Windows, or /Volume/Macintosh HD/$scenepath/prod drawings on Macintosh, and you save the scene scene01 in +scenes\seq01 , the project browser will display the following:
- Projects
- Project01
- +scenes
- scene01.tnz
+drawings
with +drawings that is C:\seq01\scene01\prod drawings on Windows, or /Volume/Macintosh HD/seq01/scene01/prod drawings on Macintosh, and is located under the related scene file (TNZ format).
If the $scenepath is used in the folder definition, with +drawings that is C:\prod drawings\$scenepath on Windows, or /Volume/Macintosh HD/prod drawings/$scenepath on Macintosh, and you save the scene scene01 in +scenes\seq01 , the project browser will display the same as above, but this time +drawings is C:\prod drawings\seq01\scene01 on Windows, or /Volume/Macintosh HD/prod drawings/seq01/scene01 on Macintosh.