Working in Xsheet/Timeline
The Xsheet, the digital version of the traditional exposure sheet, allows you to control the timing of all of the elements of a scene. It is organized in columns and rows: each column contains a layer of the animation and each row represents a frame contents. Columns are divided into cells, representing the content of that column in a particular frame.
The Timeline is the horizontal counterpart of the Xsheet, it serves the same purpose, and has the same functionality. The main differences with the Xsheet are that in the Timeline the different levels are laid out in horizontal layers, while each frame content is represented by the columns of the Timeline.
In both of them, different items, generically called here as levels, can be loaded into the scene: animation levels, images for the background and overlays, and video clips.
Other Tahoma scenes can be loaded there as well: they will be nested inside a column/layer, and considered as a Subscene of the current Xsheet/Timeline.
All of the Xsheet/Timeline contents can be checked in the viewer, where the animation can be played back, and the scene contents edited.
Using the Viewer
The viewer has different modes of visualizing the scene contents. According to your needs you can view the whole work area, only the elements included in the current camera shot, or visualize the whole scene in a 3D environment. The viewer can also be frozen, so that the visualization is not updated until you enter with the pointer in the viewer. When the preview mode is activated, the viewer can display the rendered animation as in the final render (see Previewing the Animation ).
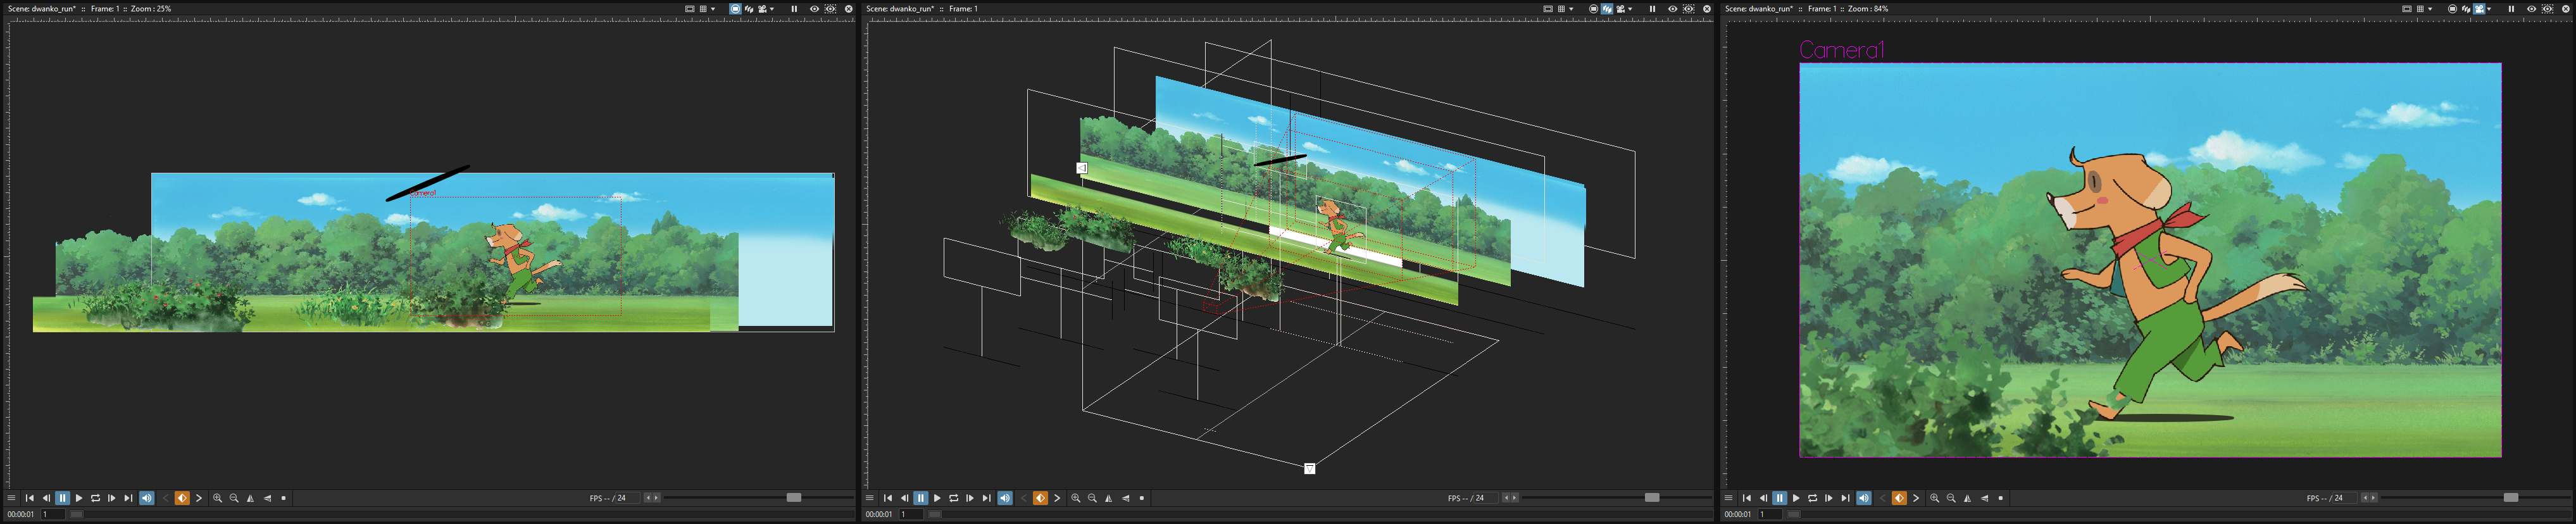
Camera Stand view, 3D view and Camera view modes.
At the bottom of the viewer another customizable set of buttons is available. Some are used for playback (see Using the Viewer ), some others are relevant only when using the Animate tool ( ) to animate objects and when previewing the animation in the viewer (see Animating Objects and Previewing the Animation ).
Additional elements like a field guide, or the table, can be displayed or hidden, and the background color can be set (see Customizing the Viewer ).
Tip
To switch the view mode in the viewer:
Use the buttons available in the viewer title bar to do the following:
The Camera Stand View button (
 ) is for standard view, where any part of the work area can be displayed. When playing back the scene, the work area stands still, while all of the other elements, including the camera, move in relation to its position.
The 3D View button (
 ) is for activating or deactivating the 3D view of the elements composing the scene (see Working in a 3D Environment ).
The Camera View button (
 ) is for keeping the box representing the camera still, while all of the other elements move in relation to its position. It can help you to better understand the shot when there are camera trucks, or rotations.
Note
When a frame is selected in the Level Strip, the view mode is set accordingly to display that level only. Pressing one of these buttons will revert the viewer back to showing the whole scene content.
Tip
To freeze/un-freeze the viewer:
Click the Freeze button ( ) in the viewer title bar to freeze/unfreeze the displayed content; when activated the word frozen is displayed at the center of the work area.
Tip
To update the viewer content when it is frozen:
Move the pointer over the viewer.
Using the File Browser
All the elements you need for a scene can be retrieved by using a file browser.
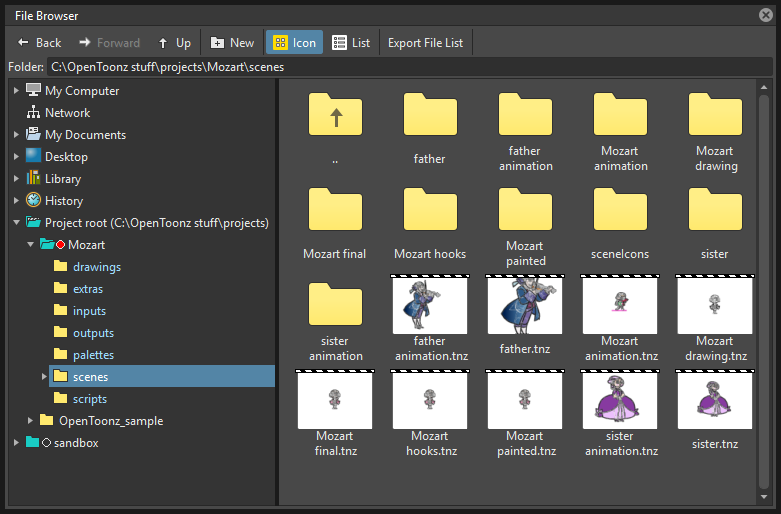
You can either use the standard Tahoma file browser to drag and drop levels or folders to the Xsheet/Timeline or the Scene Cast panel, or use the Load Level… and Load Folder… commands from the File menu. In both cases you can perform a multiple selection to load several levels or folders at the same time, that will be exposed each in a separate column; if you use the Load Level… command, when loading an animation level you can also specify the frame range to load. When you use the Load Folder… command all the files contained in the folder (if supported) are loaded into the Xsheet/Timeline.
Note
When a level is loaded, Tahoma checks if its syntax matches one of the level formats specified into Preferences → Loading → Level Settings by File Format. In this case the Level Settings specified will be applied. It is possible to add as many formats as you want, defining them by using a Regular Expression. This way, different settings can be automatically applied to different kind of levels.
Note
It is possible to Ignore Alpha Channel on Levels in Column 1 by activating the option in Preferences → Scene.
In the file tree available on the left there are the following main items:
My Computer contains files and folders located in your computer.
Network allows the access to network computers.
My Documents contains files and folders located in the OS My Documents folder.
Library displays files and folder located in the
Projectroot\libraryfolder.History contains recently saved scenes, organized in folders, one for each of the last seven days Tahoma was used.
Projectroot lists all the projects that have been created as folders containing the project information and material; the actual path of the projectroot is displayed in brackets (see Using the Project Browser ).
Note
In case more than one projectroot is defined, each will be displayed with the related projectroot path in brackets.
Version control repository folder, labeled according to the version control configuration, contains the folders and files under the version control system (see Using the Version Control ).
Note
In case several repositories are defined, each will be displayed with its appropriate label (see Configuring the Version Control in Tahoma ).
You can open folders and sub-folders in order to retrieve files that are displayed in the area on the right. The current location path is displayed at the top of the browser; existing folders can be renamed and new folders can be created. Files can be displayed as icons or as a list, displaying additional informations that can be also used to sort them.
Note
The way file icons are generated in the Tahoma browser depends on the images resolution and on the Icon Size option set for the Level Strip frames in the Preferences → Interface dialog (see Using the Level Strip ).
Loading Levels
As part of the scene you can load Vector and Smart Raster animation levels (PLI and TLV), Toonz palettes (TPL), Raster full-color images or image sequences (BMP, JPG, NOL, PNG, RGB, SGI, TGA, TIF and TIFF), video clips (AVI, MOV, and MP4 and WebM with the aid of FFMPEG, if installed), Photoshop documents (PSD), vector images (SVG) and audio files (AIFF, WAV and MP3 with the aid of FFMPEG, if installed). Images or clips with alpha channel information will retain their transparency information, once imported.
Note
It is also possible to load legacy TZU and TZP files created with Toonz version 4.x: in this case the files will be automatically converted and loaded in the TLV format.
Note
SVG files are automatically converted and loaded in PLI format.
Note
Photoshop files can be loaded taking into account the layers the document is made of (see Loading Photoshop Documents ).
Single image files can have numbers and letters as part of their names, but they must comply with certain rules to be considered valid ones. Following are several descriptive examples of valid and invalid image file names:
Valid name types:
a1.tga,1a1.tga,1aa.tga,1aaa.tgaInvalid name types:
1.tga,111.tga,1a.tga,111a.tga
Image sequences are recognized and loaded by Tahoma file browser as a single animation level, if they are named with a progressive four-digits number written between the base file name and the file extension, e.g. animation.0001.tif , animation.0002.tif , etc. or animation_0001.tif , animation_0002.tif , etc.. They are displayed in the file browser with a double dot or an underscore and a dot before the file extension: e.g. animation..tif or animation_.tif
From the browser, you can View images and clips you are going to load as levels by opening a flipbook whose default shrink factor and step can be set in the preferences dialog, and see the related file information by opening an Info box (see Using the Flipbook ).
Tahoma scenes (TNZ files) can be loaded as part of another scene as well, in such a case they are loaded as Subscenes (see Loading a Scene as a Subscene ).
When you load levels using the standard Tahoma file browser, you can set whether to automatically expose them in the Xsheet/Timeline or not, by setting the Expose Loaded Levels in Xsheet option in the Preferences → Loading dialog. If activated, each level will be placed in a different column/layer, starting from the first empty one. If deactivated, the loaded levels will be stored in the Scene Cast, from where they can be selectively exposed in Xsheet columns or Timeline layers (see Using the Scene Cast ).
If you are loading one or several files located outside the default current project folders, you are prompted whether to Import them to the project database or to Load them from where they are. In the former case files will be copied to the appropriate project folder (PLI, TLV levels and their palettes in the +drawings folder; raster images, video clips and audio files in the +extras folder; standalone palettes in the +palettes folder, etc.) and loaded with a relative path from this new location (see Managing Projects ); in the latter case they will be loaded using an absolute path to their original location.
If any of the files you want to import has the same name of a file already existing in the destination project folder, you will prompted whether to keep the existing file, overwrite it with the new one, or rename it by adding a suffix you can choose. In this way you can control if files you are importing have already been imported previously, or manage files that just share the same name.
Note
WARNING: It is heavily recommended to Import assets to the current project folders, as Tahoma can overwrite the files associated with levels exposed in the Xsheet/Timeline, each time the Save Level, Save All Levels, or Save All commands are invoked.
Note
Files loaded in a scene without importing can be imported later all at once by using the Collect Assets command (see Collecting Assets ).
Note
The Tahoma file browser displays only the relevant files that can be loaded in Tahoma. To check the full content of a folder you can use the Show Folder Contents option (see below).
Tip
To choose the browser display mode:
Do one of the following:
Click the Icon button (
 ) in the bottom bar of the browser to display files with the related icons.
Click the List button (
 ) in the bottom bar of the browser to display files in a list with related s; click the labels at the top of the columns to sort files accordingly; right-click the label at the top of the columns to open the menu that allows to toggle the visualization of the columns.
Tip
To resize the browser sections:
Do any of the following:
Click and drag the separator to resize sections.
Click and drag the separator towards the panel border to hide a section.
Click and drag the separator collapsed to the panel border toward the panel center to display again the hidden section.
Tip
To rename an existing folder:
Double-click the folder name and rename it.
Tip
To create a new folder:
Click the new folder button ( ) in the bottom bar of the browser.
Tip
To move one folder up in the file tree:
Click the folder up button ( ) in the bottom bar of the browser.
Tip
To load levels from the Load Level browser:
Select the Xsheet/Timeline cell where you want to start exposing the level; if any level is already exposed in that cell, a new column/layer will be inserted to expose the new level.
Do one of the following:
Choose File → Load Level.
Right-click in the Xsheet/Timeline cell and choose Load Level from the menu that opens.
In the browser that opens select the file you want to load as a level; if you select a video or image sequence file, you can select the frame range you want to load by using the Load Subsequence Level options.
Click the Load button.
Tip
To load levels from the Tahoma standard browser:
Select the Xsheet/Timeline cell where you want to start exposing the level; if any level is already exposed in that cell, a new column/layer will be inserted to expose the new level.
In the Tahoma browser select the file you want to load as a level.
Do one of the following:
Drag and drop the selection to the Scene Cast panel or to the Viewer.
Drag and drop the selection to the Xsheet/Timeline cell where you want to start exposing it.
Right-click the selection and choose Load from the menu that opens.
Note
Files can also be loaded by dragging and dropping them from the Windows Explorer or macOS Finder to the Scene Cast, Xsheet/Timeline or Viewer.
Tip
To load folders:
Select the Xsheet/Timeline cell where you want to start exposing the levels; if any level is already exposed in that cell, a new column/layer will be inserted to expose the new levels.
In the Tahoma File menu select the Load Folder… command.
In the File Browser that opens select the folder you want to load.
Press the OK button.
Note
Folders can also be loaded by dragging and dropping them from the Windows Explorer or macOS Finder to the scene cast, Xsheet/Timeline, or Viewer.
Note
When a level is loaded, Tahoma checks if its syntax matches one of the level formats specified in Preferences → Loading → Level Settings by File Format. In this case the Level Settings specified when the corresponding Edit button is opened will be applied. It is possible to add as many file formats as you want, defining them by using a Regular Expression. This way, different settings can be automatically applied to different kind of levels.
Tip
To load back a recently loaded level:
Choose File → Open Recent Level File, then select the level you want to load from the available submenu.
Tip
To make a multiple selection in the file browser:
Do one of the following:
Click to select a file.
Ctrl-click (PC) or Cmd-click (Mac) to add to or remove a file from the selection.
Shift-click to extend the selection.
Right-click in the right area of the browser and choose Select All from the menu that opens to select all the files contained in the current folder.
Tip
To view a level in the flipbook:
Do one of the following:
In the Tahoma browser or in the Xsheet right-click the level you want to view and choose View from the menu that opens.
Choose Panels → Flipbook and drag and drop in the panel the file you want to view.
Note
By opening several Flipbook panels you can view several levels at the same time.
Tip
To set the default shrink factor and step for the file viewer:
Choose File → Preferences → Interface.
Set the default Viewer Shrink and Step values.
Tip
To view a level file information:
In the Tahoma browser or in the Xsheet/Timeline right-click the level whose info you want to view and choose Info from the menu that opens; if the file is a video or a sequence of images, use the slider at the bottom of the box to change the current frame and see the related information.
Tip
To view the entire contents of the current folder:
Right-click in the right area of the browser and choose Show Folder Contents from the menu that opens: the entire folder contents are displayed in a default OS window.
Loading Photoshop Documents
Photoshop documents (PSD files) can be loaded as a scene element in Tahoma taking into account the layers the document is made of, and their layering order; text layers are considered as standard layers, while layer styles are considered only when loading the document as a single image (see below).
Supported formats are RGB or grayscale images, using 8 or 16 bits per channel color depth.
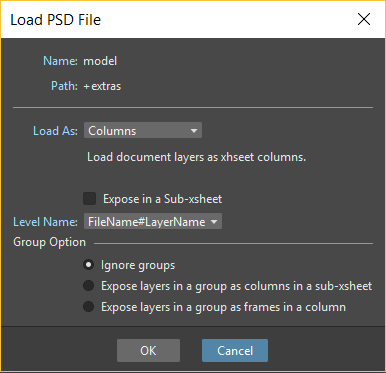
When a Photoshop document is loaded, a dialog opens to set the way the document has to be exposed in the Xsheet. Options are the following:
Single Image, flattens all the document layers into a single image. Only layers that were visible when the Photoshop document was saved are considered. The level name and path in Level Settings, and the scene cast, refer to the original name of the Photoshop document (see Editing Level Settings and Using the Scene Cast ).
Note
Photoshop documents can be loaded as a Single Image only if the Maximize Compatibility option was checked when saving the original file from Photoshop. If the option was deactivated, a dummy image is displayed instead; loading and saving again the document with the option activated fixes the problem.
Frames, loads each document layer as a frame, and exposes them as a sequence in an Xsheet column. Any layer group defined in the original document is ignored. The level name and path in Level Settings, and the Scene Cast, refer to the original name of the Photoshop document with the #frames suffix (see Editing Level Settings and Using the Scene Cast ).
Columns, loads each document layer as a column, and it is possible to automatically create a Subscene containing the columns by activating the Expose in a Subscene option.
When a Photoshop document is loaded as Columns, it is also possible to set how new Level Names are assigned. Options are the following:
FileName#LayerName, uses the PSD file name and layer names as the names of newly created levels.
LayerName, uses the PSD layer names as the names of newly created levels.
When a Photoshop document is loaded as Columns, it is also possible to set the way groups of layers have to be considered. Options are the following:
Ignore groups, overlooks any group of layers defined in the document, and each layer is exposed in a different column. The level name and path in Level Settings, and the scene cast, for each level refer to the original name of the Photoshop document with the #layerName suffix (see Editing Level Settings and Using the Scene Cast ).
Expose layers in a group as columns in a Subscene, creates for each group a Subscene containing each layer of the group as a column. If a group contains other groups, the Subscene will contain other Subscenes that will contain the related layers as columns. The level name and path in Level Settings, and the scene cast, for each level refer to the original name of the Photoshop document with the #layerID suffix (see Editing Level Settings and Using the Scene Cast ).
Expose layers in a group as frames in a column, creates for each group a column containing each layer of the group as a cell. If a group contains other groups, they will be ignored. The level name and path in Level Settings, and the scene cast, for each level refer to the original name of the Photoshop document with the #groupID#group suffix (see Editing Level Settings and Using the Scene Cast ).
Note
In order to be properly displayed in the final rendering, images based on Photoshop document layers have to be premultiplied either using the Premultiply option in the Level Settings dialog, or the Premultiply effect (see Editing Level Settings and Premultiply ).
Executing Tasks in the File Browser
Some tasks concerning files can be executed directly in the File Browser.
Files can be duplicated, converted to a different format, converted to TLV (Smart Raster image) format, renamed, premultiplied, and you can choose to separate their colors.
When duplicating files, the new files will be renamed by appending an underscore followed by progressive numbering.
You can also separate the colors of an image or image sequence by using the Separate Colors… command. For more details on its options, please see the Separate Colors section.
When renaming, files will be renamed according to the name you specify; an option allows you also to delete the original files. This can be used both for renaming sequences of image files in one shot, and for converting sequence numbering modes to the Tahoma standard one (i.e. a progressive four-digits number written between the file name and the file extension) by selecting only the first file of a sequence.
When premultiplied, the file alpha channel is modified to be properly displayed in Tahoma. Images which have a meaningful alpha channel come in two types: premultiplied or straight. A non-premultiplied (straight) image can be recognized when it’s loaded in Tahoma because its edges, where there is a complete transparence on one side and opacity on the other, are not smooth, but displays show a solid halo; by premultiplying the image it’s possible to fix this problem. This is available only for full-color images.
When converting files, a dialog prompts the frame range to convert, a saving location, a name, the new format with related options and a color for the background of the converted file. It is also possible to select more files at once but, in this case, the frame range and the file name fields won’t be available. All levels, images and clips supported by Tahoma can be converted. The PLI vector files can also be converted to the SVG format.
Note
The Convert… command is also available in the File menu as Convert File….
When converting files to TLV format, it’s possible to choose the painted or unpainted TLV formats; all levels, images and clips supported by Tahoma can be converted, except for PSD files.
The conversion to the unpainted TLV format is available when one or several files are selected and it’s meant for lineart images: the images and levels are converted into black lineart images with a transparent background, so that they can be painted with the same techniques and tools you can use for other Smart Raster levels (see Painting Animation Levels ). In particular if images have some transparency, transparent pixels remain transparent, while solid pixels are transformed into black ones; if images have no transparency, white and lighter pixels will be assumed as transparent, while dark pixels are transformed into black ones.
The conversion to the painted TLV format is available when two files are selected or when the selected files are Raster Full color without antialiasing. In the case of the two files, one is meant to be the lineart and the other a painted version of the same image: the images and levels are converted into painted lineart images with a palette, so that they can be edited with the same techniques and tools you can use for other Smart Raster levels (see Managing Palettes and Styles and Painting Animation Levels ). In the case of conversion from Raster Full color without antialiasing, an Heuristic is used to recognize lines and painted areas creating a TLV level where the lines are seen as ink and the painted areas as paint.
In particular if images have some transparency, transparent pixels remains transparent, while solid pixels are transformed into lines according to their color; if images have no transparency, white and lighter pixels will be assumed as transparent, while dark pixels are transformed into black lines.
Note
When converting to the TLV format, sequence numbering modes different from the Tahoma standard one (i.e. a progressive four-digits number written between the file name and the file extension) are supported, so that only the first file of a sequence is required to be selected to include the whole sequence in the conversion.
Tip
To Duplicate files:
Select the files you want to duplicate.
Right-click any of the selected files and choose Duplicate from the menu that opens.
Tip
To Rename files:
Select the files you want to rename.
Right-click any of the selected files and choose Rename from the menu that opens.
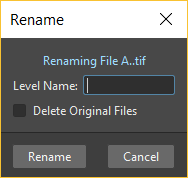
In the dialog that opens assign a new name to the file and choose whether to Delete Original Files by activating the related option.
Click the Rename button.
Tip
To Premultiply full-color images:
Select the files you want to premultiply.
Right-click any of the selected files and choose Premultiply from the menu that opens.
Tip
To Convert a file to a different format:
Right-click the file you want to convert and choose Convert from the menu that opens. The Convert window change depending on the format of the selected files.
Choose the frame range to convert, the saving location, a name, the new format, and the background color of the converted file.
Activate the Skip Existing Files to to prevent overwriting already existing files.
If needed, set the options for the file format chosen pressing the Options button and inserting the new values.
Click the Convert button.
Tip
To Convert several files at once to a different format:
Select the files you want to convert.
Right-click any of the selected files and choose Convert from the menu that opens.
Check the number of files you are going to convert reading the value from the header of the Convert window.
Choose the saving location, the new format, and the background color of the converted files.
Activate the Skip Existing Files to to prevent overwriting already existing files.
If needed, set the options for the file format chosen pressing the Options button and inserting the new values.
Click the Convert button.
Tip
To Convert files to the unpainted TLV format:
Select the lineart files you want to convert.
Right-click any of the selected files and choose Convert from the menu that opens.
Select unpainted tlv from the File format drop down menu.
Choose the saving location and, if you have selected one sequence, the frame range.
Activate the Skip Existing Files to to prevent overwriting already existing files.
Activate the Apply Autoclose.
Choose how to manage Antialiasing from the drop down menu. You can preserve the original antialiasing selecting Keep Original; add some antialiasing selecting Add and writing an Intensity value in the following text input field; remove the antialiasing selecting the Remove option and writing a Threshold value in the following text input field.
Choose how to manage the palette of the tlv file/s you are going to create. By default a new palette is created. If you prefer to use an existing palette press the button next the palette field and use the browser to locate the palette file you desire to use.
Click the Convert button.
Tip
To Convert files to the painted TLV format from two images:
Select the lineart file and the painted version of the same file you want to convert.
Right-click any of the selected files and choose Convert from the menu that opens.
Select painted tlv from the File format drop down menu.
Choose the saving location and, if you have selected one sequence, the frame range.
Activate the Skip Existing Files to to prevent overwriting already existing files.
Choose the folder where the unpainted files are located.
Specify the Suffix used for naming the unpainted version of the files (default is _u, but you can use anything you like when preparing the files for convertion).
Activate the Apply Autoclose.
Choose how to manage Antialiasing from the drop down menu. You can preserve the original antialiasing selecting Keep Original; add some antialiasing selecting Add and writing an Intensity value in the following text input field; remove the antialiasing selecting the Remove option and writing a Threshold value in the following text input field.
Choose how to manage the palette of the tlv file/s you are going to create. By default a new palette is created. If you prefer to use an existing palette press the button next the palette field and use the browser to locate the palette file you desire to use.
Click the Convert button.
Tip
To Convert files to the painted TLV format from non AA source:
Select the Raster Full color file you want to convert.
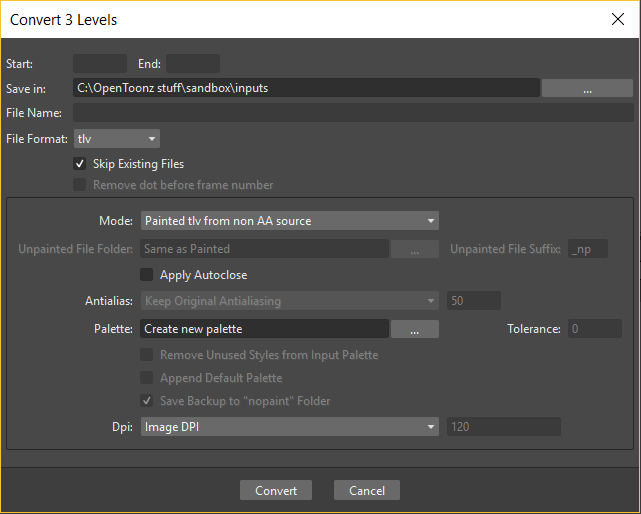
Choose the saving location and, if you have selected one sequence, the frame range.
Activate the Skip Existing Files to to prevent overwriting already existing files.
Choose the output folder.
Activate the Apply Autoclose if needed.
Choose how to manage the palette of the tlv file/s you are going to create. By default a new palette is created. If you prefer to use an existing palette press the button next the palette field and use the browser to locate the palette file you desire to use. Sets a Tolerance value for the correlation between the RGB value of the areas and the indexes color of the palette.
Click the Convert button.
Separate Colors
The Separate Colors feature, allows for separating single drawing by colors of pencils, generating independent image files to make it easier to use them in a subsequent compositing workflow.
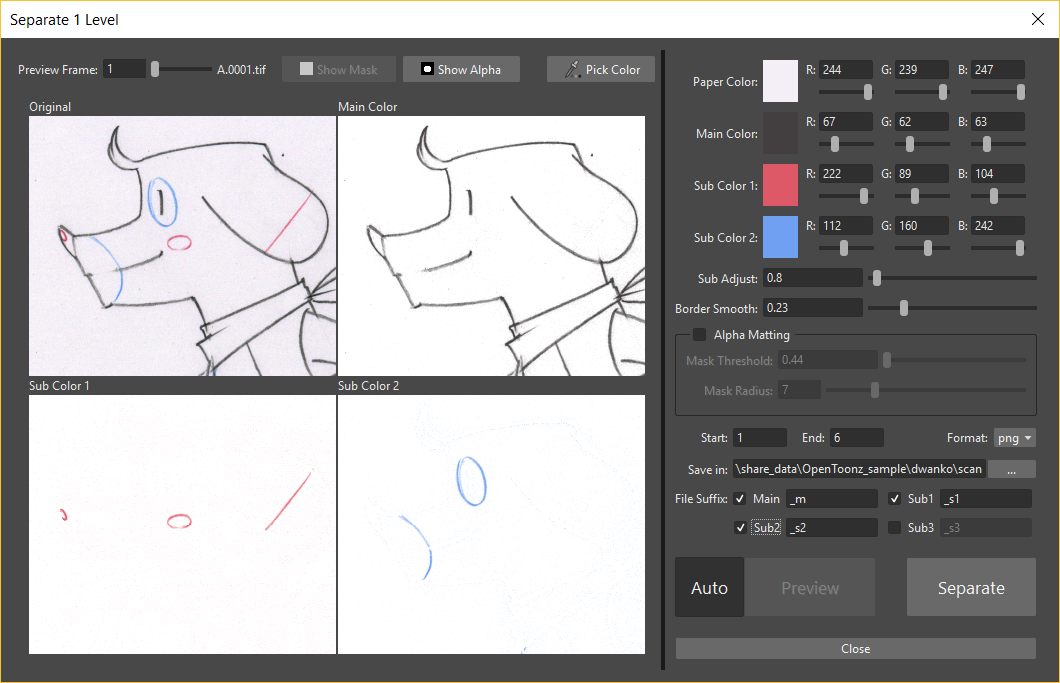
Unlike conventional threshold-based algorithms, this feature can produce more natural results, since it separates pixels in a more flexible way, by using the HLS color space.
Note
Currently this is a “utility” feature, which means that it’s independent from the current loaded scene or active project. It just works on selected raster image files in the File Browser.
The produced output images contain an alpha channel equal to the line intensity.
Note
You can compose the line by loading the separated images as levels, or you can also connect the levels to a MatteIn effect with some color card if you would like to alter the line color.
The available parameters are:
Preview Frame:, defines the frame to be shown in the preview area.
Show Mask, shows the Alpha Matting parameters results in the preview area.
Show Alpha, shows the generated alpha channel in the preview area. This is the alpha channel that will be present in the new generated image files, product of the separation work.
Pick Color, lets the user pick a color from the left preview area. The picked color will be assigned to the currently selected color swatch.
Note
You can click and drag over any of the preview area images to pick an average color for the defined rectangle.
Paper Color:, allows to define the paper color, used to calculate transparency of the separated images.
Main Color:, allows to define the color for the main ink in the drawings. For better results, it’s advised to pick the darkest color possible.
Sub Color1:, Sub Color2: and Sub Color3:, allows to define the color for the other respective color inks in the drawings you wish to separate. For better results, it’s advised to pick the deepest (darkest, more saturated) color possible.
Note
The Sub Color3: parameters will only show when Sub3 suffix is enabled, in the File Suffix: parameters area.
Sub Adjust:, allows to adjust the prevalence of sub-colors with respect to the black ink.
Border Smooth, allows to make the intersection of lines having different colors smoother.
Alpha Matting, allows to better remove noisy backgrounds, while preserving subtle faint parts of the pencil’s stroke at the same time.
Note
To be able to preview the Alpha Matting, the Show Mask option at the top of the preview area should be activated.
Mask Threshold, allows to make the noisy background pixels transparent.
Note
The regions to become transparent background in the output image are shown in red or blue colors in the preview area.
Mask Radius, can create a solid border area around the detected colored strokes, to preserve subtle faint parts of them.
Start: and End:, when separating image sequences it allows to set a frame range for the color separation work to be done.
Format:, defines the file format to use for the new generated files. Available options are: PNG and TIF.
Save in:, defines where the new generated files will be saved.
File Suffix:, allows the definition of file suffixes for the Main, Sub1, Sub2 and Sub3 color generated image files.
Note
If Sub3 is enabled the left preview area will change to accomodate the new separation color. Also, and additional Sub Color3: option will show in the right parameters area.
Auto, toggles the automatic preview of the separation in the left preview area.
Preview, allows to manually preview the separation in the left preview area. Only active when the Auto option is disabled.
Separate, executes the color separation operation on the selected files.
Tip
To Separate Colors of an image into separate image files:
Right-click the file you want and choose Separate Colors… from the menu that opens. The Separate Colors window shows, where you can select several options for the operation.
Choose the appropriate preview and separation options for the desired result.
Press the Separate button to execute the color separation job.
Close the window by pressing the Close button.
Exposing Levels
Toonz level files, images for backgrounds and overlays, audio files, video clips, and other Tahoma scenes, have to be exposed in the Xsheet/Timeline columns in order to be part of the scene.
If the asset you want to use has already been loaded but not exposed, or it was removed from the scene, it can be retrieved from the Scene Cast panel.
In case you need to retrieve some specific drawings from an animation level, you can display it in the Level Strip, in order to select the drawings to expose.
Note
Animation levels you define directly in the scene, for instance levels you scanned, or drew directly in Tahoma, are automatically exposed in the Xsheet/Timeline.
Using the Scene Cast
All the animation levels you create or load in the scene are stored in the Scene Cast pane. Levels remain available in the Scene Cast even if they are not used in the scene anymore. From the Scene Cast, they can be exposed, edited, saved and removed.
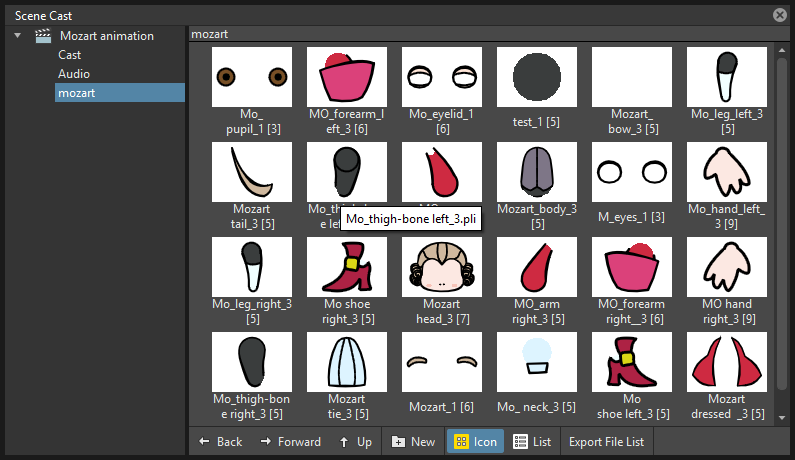
In the tree available on the left you can find the following:
A clapboard icon referring to the current scene.
The Cast folder containing all the animation levels you create or load.
The Audio folder containing all the audio files you load or create (see Creating a Soundtrack ).
You can create new folders and sub-folders where animation levels can be arranged. The current location path in the cast tree is displayed in the cast top bar; folders can be renamed and new folders can be created. Levels can be displayed with related icons, or in a list displaying additional informations that can be also used to sort files.
Note
Animation levels that are no longer available at the defined path are identified by a red color.
Tip
To display all the cast elements of a specific folder:
Click the folder icon in the cast tree on the left of the pane.
Tip
To display all the cast elements:
Click the clapboard icon at the top of the cast tree on the left of the pane.
Tip
To choose the cast display mode:
Do one of the following:
Click the Icon button (
) in the bottom bar of the cast to display levels with the related icons.Click the List button (
) in the bottom bar of the cast to display levels in a list; click the labels at the top of the columns to sort files accordingly.
Tip
To resize the Scene Cast sections:
Do any of the following:
Click and drag the separator to resize sections.
Click and drag the separator towards the panel border to hide a section.
Click and drag the separator collapsed to the panel border towards the panel center to display again the hidden section.
Tip
To rename an existing folder:
Double-click the folder name and rename it.
Tip
To create a new folder:
Click the New button () in the bottom bar of the cast.
Tip
To move one folder up in the cast tree:
Click the folder up button () in the bottom bar of the cast.
Tip
To perform a selection:
Do one of the following:
Click to select a level.
Ctrl-click (PC) or Cmd-click (Mac) to add a level to or remove it from the selection.
Shift-click to extend the selection.
Tip
To move levels to a folder:
Select them and drag them to the folder in the cast tree.
Tip
To expose the selection:
Do one of the following:
Choose Level → Expose in Xsheet.
Right-click the selection in the Scene Cast and choose Expose in Xsheet from the menu that opens. In case of a multiple level selection, each level will be placed in a different column/layer, starting from the first empty one.
Drag and drop the selection to the Xsheet/Timeline cell where you want to start exposing it. In case of a multiple level selection, each level will be placed in a different column/layer.
Tip
To display an animation level in the Level Strip:
Do one of the following:
Select it in the Scene Cast and choose Level → Display in Level Strip.
Right-click it in the Scene Cast and choose Display in Level Strip from the menu that opens.
Tip
To remove the selected elements:
Right-click the selection in the Scene Cast and choose Remove Level from the menu that opens.
Note
Levels can be removed only if they are not used in the scene.
Tip
To remove all the unused elements:
Do one of the following:
Choose Level → Remove All Unused Levels.
Right-click in the Scene Cast and choose Remove All Unused Levels from the menu that opens.
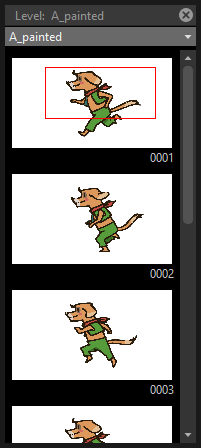
Using the Level Strip
When an animation level is displayed in the Level Strip, you can select the specific drawings you want to expose in the Xsheet/Timeline. This feature may prove useful especially when you need to retrieve some drawings that belong to the level, but that are not available in the Xsheet/Timeline cells.
Tip
To display an animation level in the level strip:
Do one of the following:
Select any level drawing exposed in the Xsheet/Timeline.
Select it in the Scene Cast and choose Level → Display in Level Strip.
Right-click it the Scene Cast and choose Display in Level Strip from the menu that opens.
Tip
To select drawings in the Level Strip:
Do one of the following:
Click to select a drawing.
Ctrl-click (PC) or Cmd-click (Mac) to add a drawing to or remove it from the selection.
Shift-click to extend the selection.
Tip
To expose the selection:
Do one of the following:
Copy and paste the selection in the Xsheet/Timeline, into the cell you want.
Right-click in the Level Strip selection and choose Expose in Xsheet from the menu that opens. Drawings will be exposed at the beginning of the first empty column.
Drag and drop the selection to the Xsheet/Timeline cell where you want to start exposing it.
Drag and drop the selection to the Xsheet/Timeline cell where you want to start exposing it and keep the Shift key pressed, to insert them if other content is already exposed in the destination cells.
Drag and drop the selection to the Xsheet/Timeline cell where you want to start exposing it and keep the Alt key pressed, to overwrite any other content previously exposed in the destination cells.
Note
When it is not possible to expose the selection, a red outline is displayed instead of the selection.
Replacing Levels
An animation level exposed in the Xsheet/Timeline can be easily replaced by another animation level, preserving any editing performed in the sequence of drawings exposed in the column/layer cells. In this way it is possible to reuse the same edited sequence for different levels. For example you can reuse the edited sequence of a character level for the related shadow level by copying and pasting the character sequence, then replacing the character level with the shadow one.
It is possible to replace the level as a whole, or limited only to selected cells. In both cases only the content of the selected cells will be replaced: if any drawing of the replaced level is exposed somewhere else in the Xsheet/Timeline, it will not be affected by the replacing operation.
In case the new level does not contain some of the frames you are going to replace, the level name and number in the cell turn red to warn you that there is no drawing available for that cell.
The original level is preserved in the Scene Cast from where it can be retrieved, or removed (see Using the Scene Cast ).
Tip
To replace a level in the Xsheet/Timeline:
Select the cells where the level you want to replace is exposed.
Do one of the following:
Choose Level → Replace Level….
Right-click the selection and choose one of the options in the Replace Level submenu, from the menu that opens.
In the browser select the new level, and click the OK button (see Using the File Browser ).
Editing Level Settings
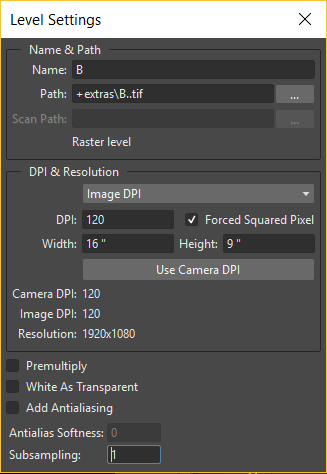
Once a level is exposed, its properties (path, DPI, subsampling, etc.), can be controlled in the Level Settings dialog. Settings are the following:
Name is the name used to identify the level, by default it is the same name of the file.
Path displays the location of the file, using default folder aliases if needed. By typing in this field, or using the browser button, you can update the path to a different location, or to different file.
Note
If in the browser you choose any project default folder, in the path field the full path will be replace by the related default folder alias (see Project Default Folders ).
Scan Path displays the location of the scanned images that were cleaned up to obtain the actual level (see Cleaning-up Scanned Drawings ). This is available only for Smart Raster levels.
DPI lets you change the level DPI, thus changing its size. To return to the original image DPI set the option menu above to Image DPI.
Forced Squared Pixel forces a level that has a different horizontal and vertical DPI, and therefore is displayed stretched, to have the pixel shape squared, and thus to be displayed properly.
Width and Height let you set a different size for the level, thus changing its DPI. The level maintains its A/R.
Use Camera DPI button applies to the level automatically the camera DPI. It is useful when the level has the same size of the camera but different DPI, and you want it to match perfectly the camera.
Information about Camera DPI, Image DPI and image Resolution are displayed for reference purposes.
Premultiply premultiplies the alpha channel of the level. Images which have a meaningful alpha channel come in two types: premultiplied or not. A non-premultiplied image can be recognized when it is loaded in Tahoma because its edge, where there is a complete transparence on one side and opacity on the other, is not smooth, but displays a solid halo. With the premultiply operation it is possible to transform the image alpha-channel so that it is correctly displayed in Tahoma camera stand, preview and rendering.
White As Transparent sets the pure white color (i.e. with red, green and blue values to 255) as transparent and automatically adds some antialiasing to the level images. This option is meant for animation levels generated from third-party software (such as Retas) that do not have a transparent background but a solid white one, and whose lines do not have antialiasing.
Add Antialiasing gives the user the possibility to add antialiasing to the level. The antialiasing value has to be specified in the Antialias Softness field, which can range from 0 to 100. This option is available on Smart Raster and Raster levels.
Subsampling sets the simplifying factor to be applied to animation levels, clips and images when displayed in the work area in order to have a faster visualization and playback; for example if it is 2, one pixel every two pixels is displayed. The default values are defined in Scene → Scene Settings dialog, where values for raster (Image) and Smart Raster (TLV) level subsampling can be defined.
Note
The subsampling factor can also be applied to all the animation levels exposed in selected columns by right-clicking the header of any selected column and choosing one of the Subsampling commands from the menu that opens.
Tip
To open the Level Settings dialog:
Do one of the following:
Select a level in the Xsheet/Timeline and choose Level → Level Settings….
Right-click a level in the Xsheet/Timeline and choose Level Setting… from the menu that opens.
Right-click a level in the Scene Cast and choose Level Setting… from the menu that opens.
Quick Toolbar

The Quick Toolbar, at the top of the Xsheet and Timeline panes, is a place where the user can display favorite Tahoma tools and commands to have them readily available.
The Quick Toolbar panel can be toggled depending on user preferences.
Note
If the Quick Toolbar is too short to display all the command buttons, a double-arrow symbol will appear at the right end of it, allowing to display a drop down menu with the rest of them.
Tip
To toggle the Quick Toolbar:
Do one of the following:
Right click on any column/layer header and choose Toggle Quick Toolbar from the menu that opens.
Activate the File → Preferences → Scene → Show Toolbar in the Scene option.
Note
When the Quick Toolbar is shown, it’s also possible to activate the Expand Function Editor Header to Match Quick Toolbar Height option to correctly match the frame rows in both editors, when put side by side.
Tip
To customize the Quick Toolbar buttons:
Right click on it and select Customize Quick Toolbar from the menu that opens. The Customize Quick Toolbar panel will open.
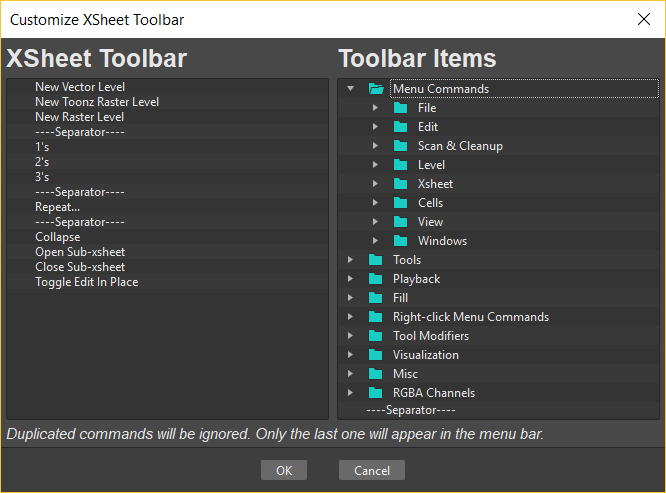
To add a command: Search for a command in the Toolbar Items list (right) and drag it to the Quick Toolbar list (left).
To add a separator: At the end of the Toolbar Items list (right), drag the —-Separator—- item to the Quick Toolbar list (left).
To delete a command: Locate the command in the Quick Toolbar list (left), right click on it and select Remove from the menu that opens.
Click OK to accept the changes or Cancel to discard them.
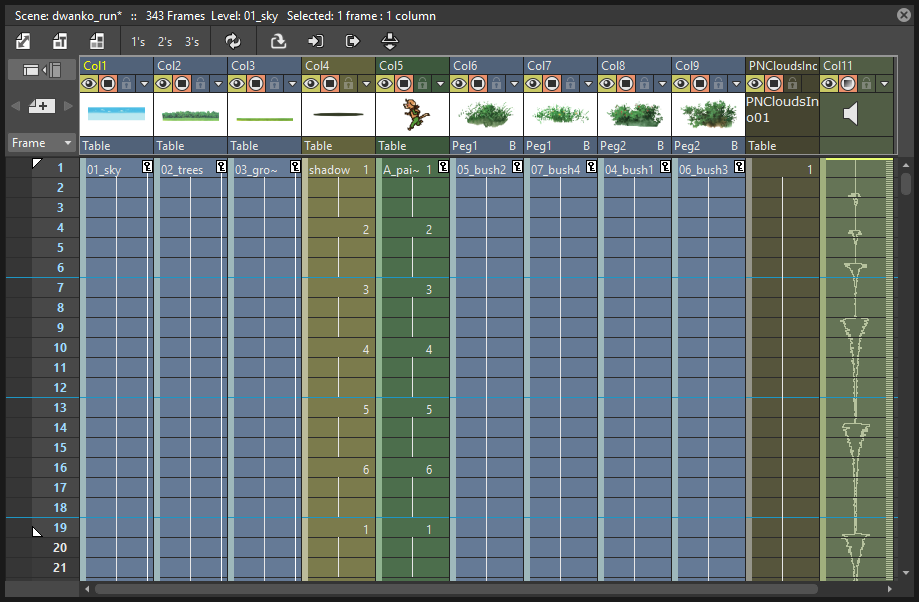
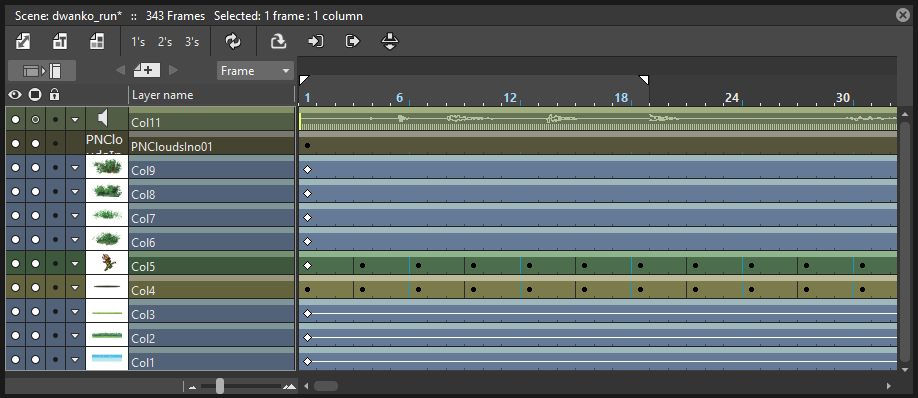
Working with Columns/Layers
When levels are exposed in the Xsheet they are placed in columns (layers, in the case of the Timeline). The column/layer stacking order sets which drawings and images are placed on top, or behind, other images. Its direction is from left to right in the Xsheet, and from bottom to top in the Timeline, so what is on the left/bottom is behind what is on the right/top. You can use the keyboard arrow keys to move between the columns/layers and time.
The Xsheet is divided into sections divided by horizontal markers (vertical, in case of the Timeline), whose interval can be customized; at each marker the name of the levels exposed can be displayed, when the option Display Level Name on Each Marker is active in the Preferences → Interface dialog.
Column/layer cells may have different colors according to the type of level they contain. Vector levels are displayed in dark yellow; Smart Raster levels in green; Raster levels in light blue; Subscenes in violet (see Using Subscenes ); Effect levels generated by Tahoma in brown (see Using the FX Schematic ); Audio levels in pale green (see Creating a Soundtrack ); and Note levels in grey.
Each column/layer header contains information about its content. These are:
Name, by default is the name of the first exposed level. The area color indicates the type of level exposed in the column/layer.
Render toggle (
) allowing you to include or not the column/layer contents in the rendering.
Camera stand toggle (
Note
The render and camera stand toggles work linked to similar toggles available in the Schematic nodes of the column/layer (see Using the Stage Schematic and Using the FX Schematic ).
Lock toggle (
) allowing you to prevent any editing in the column/layer.
Additional settings button (
) allowing you to set an Opacity value or a Color Filter to the column/layer content, when displayed in the viewer. When a column/layer has a partial opacity, its Camera stand toggle changes to a faded icon to indicate it.
Note
Optionally you can make these additional properties also take effect at render time by activating the Enable Column Color Filter and Transparency for Rendering option in the Xsheet → Scene Settings… dialog.
Preview icon of the first drawing or image exposed in the column/layer.
Note
The icons on the Xsheet column headers can either be displayed at once when the scene is opened, or on demand by clicking on the column header, according to the Column Icon option available in Preferences → Xsheet.
Parent information, is an area where the object (by default the Table) and center (by default center B) to which each column/layer is parented is displayed (see Linking Objects ). Currently this is not shown in the Timeline header.
In the Xsheet, the column on the far left displays the frame number, with the cursor indicating the current frame. The cursor can be used to set the current frame and allows you to activate the onion skin mode to better check the animation (see Using Onion Skin ). In the Timeline, the same controls are placed in the time ruler at the top of the Timeline, having an equivalent functionality.
Note
When the animation is played back, the Xsheet/Timeline scrolls according to the current frame cursor position, in order to display the current frame. To disable the scrolling deactivate the Xsheet Autopan during Playback option available in the Preferences → Scene dialog.
Above the frame number column, there are buttons for creating and navigating Memos that can be posted in the Xsheet/Timeline (see Using Memos ).
The Xsheet/Timeline can be scrolled to examine its content, while the header area and the frame column are always visible; in this way it’s easier to understand how the scene is built.
Columns/layers you want to hide in the Xsheet/Timeline can be folded in order to save space in the interface. Once folded they can be unfold at any moment and be visible in their original position by clicking on the column/layer header area.
Tip
To scroll the Xsheet/Timeline:
Do one of the following:
Middle-click and drag to scroll in any direction.
Use the mouse wheel to scroll up or down.
Use the scrolling bars to scroll only within the exposed section of the Xsheet/Timeline.
Use the Up Arrow and Down Arrow keys to move one frame backwards or forward in the Xsheet.
Use the Left Arrow and Right Arrow keys to move one frame backwards or forward in the Timeline.
Use Shift+Up Arrow and Shift+Down Arrow keys to move to the previous or next drawing, either in the Xsheet or Timeline. Use this option if you want to skip the hold frames.
Use the Page Up and Page Down keys to scroll the visible frames up or down in the Xsheet.
Use the Home and End keys to scroll up to the beginning or the end of the Xsheet content.
Tip
To set the marker interval:
Choose Scene → Scene Settings…
In the dialog that opens use the Marker Interval to set the frame interval between two markers, and the Start Frame to set at which frame the first marker has to be displayed.
Tip
To name a column:
Double-click the column/layer name in the header and type a new name.
Tip
To select columns/layers:
Do one of the following:
Click the column/layer header to select a column.
Click and drag in the column/layer icon to select contiguous columns.
Ctrl-click (PC) or Cmd-click (Mac) to add a column/layer to or remove it from the selection.
Shift-click to extend the selection.
Tip
To move a column/layer selection:
Click any area displaying the name of columns in the header, and drag it to the new position.
Tip
To edit a column/layer selection:
Select the columns/layers you want to edit.
Do one of the following:
Use the Copy command to keep in memory the selection for further operations.
Use the Cut command: to eliminate the selection from the scene and keep it in memory for further operations. The column/layer elimination causes the following columns to shift left (or the layers above to shift down).
Use the Paste command to paste the selection kept in memory starting from the selected column/layer. The command causes following columns to shift right (or layers above to shift up).
Use the Delete command to delete the selection.
Use the Insert command to insert empty columns before the selection; inserted columns/layers will be as many as the selected ones.
Note
All of these commands are also available in the menu that opens when right-clicking the column/layer header.
Tip
To include or exclude a column/layer contents from the rendering:
Click the render toggle () on the column/layer header. If you right-click the button you can select commands from a menu that opens, that let you affect several columns/layers at the same time.
Tip
To show or hide a column/layer contents in the viewer:
Do one of the following:
Click the camera stand toggle (
) on the column/layer header. The icon is faded out in case a partial opacity is set (see below). If you right-click the button you can select commands from a menu that opens that let you affect several columns/layers at the same time.Right-click the column/layer content in the viewer and choose the Hide or Show command related to the column/layer you want to hide or show.
Tip
To lock or unlock a column/layer contents:
Click the lock toggle () on the column/layer header. If you right-click the button you can select commands from a menu that opens that let you lock or unlock several columns/layers at the same time.
Tip
To set Opacity for a column/layer content:
Click the triangle icon () on the column/layer header, and do one of the following:
Use the Opacity slider to set the column/layer opacity.
Input the desired Opacity value in the numeric field, to set the column/layer opacity.
Tip
To set a Color Filter for a column/layer content:
Click the triangle icon () on the column/layer header, and set the Filter parameter to one of its predefined colors.
Note
You can make Opacity and Color Filter take effect at render time by activating the Enable Column Color Filter and Transparency for Rendering option in the Scene → Scene Settings… dialog.
Tip
To fold columns/layers:
Select the columns/layers you want to fold.
Right-click the selection and choose Fold Column from the menu that opens.
Tip
To unfold columns/layers:
Click the fold visible between the column/layer headers.
Working with Cells
When a level is exposed in a column, each cell contains a reference to a particular image. You may empty some cells, repeat some of them or change their order without affecting the real drawings sequence, because you are operating on references. This means that when a scene contains several cells referring to a drawing of an animation level, they all refer to the same drawing. This implies that when you modify a drawing of an animation level, all the cells in the Xsheet/Timeline referring to that drawing will consequently change their content.
Note
When the scene contains a reference to a drawing that is eliminated from the level, the drawing name and number in the cell turn red, to warn you that there is no drawing available for that cell anymore.
When you select a cell, you can work on the drawing it contains by using tools in the viewer.
When one or more cells are selected you can perform standard cut, copy, paste, delete and insert operations in the Xsheet/Timeline. In this case you are not modifying the animation level frames but simply changing the way it is exposed in the Xsheet/Timeline.
Selected cells can also be dragged to a new position in the Xsheet/Timeline, in duplicating, inserting or overwriting mode as well. When they are dragged to an empty column, it is possible to move along the data of the column/layer, i.e. the movement and special FX, where they were originally exposed.
Tip
To modify a drawing exposed in a cell:
Select the cell in the Xsheet/Timeline where the drawing is exposed.
Use the tools to edit it in the viewer.
Tip
To select several cells:
Do one of the following:
Click and drag to select a series of cells.
Shift-click a cell to extend the selection up to that cell.
Press Ctrl and drag to include keys in the selection. A red frame will be shown around the selection.
Click the vertical strip available on the left of the cells in the Xsheet, to select the continuous sequence of drawings belonging to the same animation level.
Click the horizontal strip available on the top of the cells in the Timeline, to select the continuous sequence of drawings belonging to the same animation level.
Tip
To edit cells with the Edit menu commands:
You can do the following:
Use the Copy command to keep in memory the selection for further operations.
Use the Cut command to eliminate the selection from the Xsheet/Timeline and keep it in memory for further operations. The cell elimination causes the following cells in the Xsheet to shift up, or in the Timeline, to shift to the left.
Use the Paste command to paste the selection kept in memory into the Xsheet/Timeline, starting from the selected insertion cell. The command causes the following cells in the Xsheet to shift down, or in the Timeline, to shift to the right.
Use the Delete command to empty the selected cells from any reference.
Use the Insert command to insert blank cells before the selection; inserted cells will be as many as the selected ones.
Note
All the Edit menu commands are also available in the menu that opens when right-clicking the Xsheet/Timeline cells.
Tip
To edit cells with the Cells menu commands:
You can do the following:
Use the Reverse command to invert the order of the selected cells.
Use the Swing command to append the selected cells, at the end of the selection, in a reversed order. The last cell of the selection will not be repeated.
Use the Random command to rearrange the selected cells in a random order. The order changes every time you use the command.
Use the Autoexpose command to repeat the selected cells, as if filling the numbering gap between two subsequent drawings. For example if the command is applied to two cells where drawing 2 and 5 are exposed, the result will be four cells with drawings 2, 2, 2 and 5. The command works only if the selection is increasingly numbered.
Note
If the Autoexpose command is used on an level numbered 1, 3, 5, 7, etc., the level will be automatically exposed step 2.
Use the Repeat command to open a dialog that allows you to repeat cyclically the selected cells by specifying a number of times, or the frame number up to which the selection has to be repeated.
Use the Reset Step command to remove any animation step in the selected cells, preserving the order of the exposed drawings.
Use the Increase Step command to increase the animation step of the selected cells by one unit.
Use the Decrease Step command to decrease the animation step of the selected cells by one unit; if a drawing is exposed in one cell only, it will be preserved.
Use the Step 2, Step 3 or Step 4 command to repeat the selected cells in order to have a step 2, step 3, or step 4 animation.
Use the Each 2, Each 3 or Each 4 command to preserve only one cell each 2, each 3, or each 4 of the selection, and delete the others.
Use the Roll Up command to shift the content of selected cells up, with the top cell content replacing the bottom cell one.
Use the Roll Down to shift the content of selected cells down, with the bottom cell content replacing the top cell one.
Note
All the Cells menu commands are also available in the menu that opens when right-clicking the Xsheet/Timeline cells.
Tip
To drag a cell selection in the Xsheet:
Do one of the following:
Click the vertical strip available on the left of the cells, and drag to move them to a new position.
Ctrl-click (PC) or Cmd-click (Mac) the vertical strip available on the left of the cells, and drag them to the new position, duplicating them.
Shift-click the vertical strip available on the left of the cells, and drag them to the new position, inserting them if other content is exposed in the destination cells.
Alt-click the vertical strip available on the left of the cells, and drag them to the new position, overwriting any other content previously exposed in the destination cells.
Note
When it’s not possible to paste the selection, a red outline is displayed instead of the selection.
Tip
To drag a cell selection in the Timeline:
Do one of the following:
Click the horizontal strip available on the top of the cells, and drag to move them to a new position.
Ctrl-click (PC) or Cmd-click (Mac) the horizontal strip available on the top of the cells, and drag them to the new position, duplicating them.
Shift-click the horizontal strip available on the top of the cells, and drag them to the new position, inserting them if other content is exposed in the destination cells.
Alt-click the horizontal strip available on the top of the cells, and drag them to the new position, overwriting any other content previously exposed in the destination cells.
Note
When it’s not possible to paste the selection, a red outline is displayed instead of the selection.
Tip
To drag a cell selection moving along the column/layer data:
Choose File → Preferences → Scene.
Set the Cell-dragging Behaviour option to Cells and Column Data.
Note
Column/layer data are moved along only when dragging the selected cells to an empty column/layer.
Note
The column/layer data are moved along except for the linked columns/layers, because linked columns/layers can only have one parent column/layer.
Using the Smart Fill Handle
The Fill Handle allows you to edit cells directly from within the Xsheet/Timeline.
It’s the small tab appearing at the bottom of the cell selection in the Xsheet, or at the right of the cell selection in the Timeline. By dragging this handle you can repeat a cell or a group of cells, you can add cells, or you can delete the last cells of a sequence. The behavior of the handle is smart: this means that the way cells are repeated, added, or deleted depends on the selection content.
Note
Editing cells with the Fill Handle makes the cells placed below the selection to shift up/down in the Xsheet (or the cells placed to the right of the selection to shift left/right in the Timeline).
Tip
To edit cell content with the Fill Handle in the Xsheet:
Do one of the following:
If you want to repeat a cell content for some frames, select the cell and drag the fill handle down.
If you want to lengthen a progressive sequence, select the cells where the sequence is exposed, and drag the fill handle down: sequence will be lengthen according to the progressive numbering. For example if the sequence is 1, 3, 5, the added images will be 7, 9, 11, etc. This works for any step the sequence may have.
If you want a random sequence to be repeated, select the sequence and drag the fill handle down: the sequence will be lengthened according to the sequence numbering. For example if the sequence is 3, 6, 4, 1, the added images will be 3, 6, 4, 1, 3, 6, etc.
If you want a progressive sequence to be repeated, first copy the sequence first drawing at the end of the sequence, then select all and drag down the fill handle. For example if the sequence is 1, 2, 3, 4, copy the drawing 1 at the end of the sequence (the result will be 1, 2, 3, 4, 1), and the added drawings will be 2, 3, 4, 1, 2, etc.
If you want to delete some cells, select a region so that the cells you want to delete are in the last columns, and drag the fill handle up.
Tip
To edit cell content with the Fill Handle in the Timeline:
Do one of the following:
If you want to repeat a cell content for some frames, select the cell and drag the fill handle to the right.
If you want to lengthen a progressive sequence, select the cells where the sequence is exposed, and drag the fill handle to the right: sequence will be lengthen according to the progressive numbering. For example if the sequence is 1, 3, 5, the added images will be 7, 9, 11, etc. This works for any step the sequence may have.
If you want a random sequence to be repeated, select the sequence and drag the fill handle to the right: the sequence will be lengthened according to the sequence numbering. For example if the sequence is 3, 6, 4, 1, the added images will be 3, 6, 4, 1, 3, 6, etc.
If you want a progressive sequence to be repeated, first copy the sequence first drawing at the end of the sequence, then select all and drag the fill handle to the right. For example if the sequence is 1, 2, 3, 4, copy the drawing 1 at the end of the sequence (the result will be 1, 2, 3, 4, 1), and the added drawings will be 2, 3, 4, 1, 2, etc.
If you want to delete some cells, select a region so that the cells you want to delete are in the last rows, and drag the fill handle to the left.
Stretching the Timing
If you need to change the timing of a selection of cells, a selected frame range, or the whole Xsheet/Timeline, you can use the Time Stretch dialog.
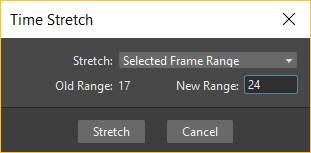
Options are the following:
Stretch defines if the new timing has to be applied to the Selected Cells, the Selected Frame Range, or to the Whole Xsheet.
Old Range displays the frame duration of the selection.
New Range defines the new frame duration of the selection.
Tip
To stretch the Xsheet/Timeline timing:
Select the cells, or define the frame range you want to stretch.
Do one of the following:
Choose Cells → Time Stretch….
Right-click the selection and choose Time Stretch… from the menu that opens.
Define the time stretching options, then click the Stretch button.
Working Globally with Frames
It is possible to insert or delete frames affecting the Xsheet/Timeline as a whole, or a selection of Xsheet columns or Timeline layers.
Inserting or deleting frames can be useful if you want to change the timing of the animation, for instance if you want to slow down or speed up an animation.
When a frame is inserted, the current frame cells are duplicated, and all the following cells are shifted down (right in the Timeline). If animation keys are defined for object transformations and FX parameters, they will be shifted down (or right in the Timeline) as well, to keep the animation consistency (see Animating Objects and Editing FX Settings ).
When a frame is removed, the current frame cells are deleted, and the following cells are shifted up (or left in the Timeline). If animation keys for object transformations and FX parameters are defined in the removed frame, they will be deleted and following keys will be shifted up (or left in the Timeline) (see Animating Objects and Editing FX Settings ).
Tip
To insert a frame:
Select the frame before which you want to insert a new frame.
Choose Scene → Insert Frame.
Tip
To remove a frame:
Select the frame you want to delete.
Choose Scene → Remove Frame.
Using Subscenes
A Subscene is a scene exposed in a single Xsheet column or Timeline layer. It can contain as many columns/layers as you want, and other Subscenes as well.
When it’s opened, the Subscene contents are displayed in the Xsheet/Timeline pane. When it is closed, it’s displayed in the Xsheet/Timeline as a violet column/layer, with its icon displaying a render of its content. The column/layer cells display the name of the Subscene, and the cell number is a reference to the frame of the Subscene content, i.e. cell 4 is a reference to frame 4 of the Subscene.
The closed Subscene level length depends on how many frames its content lasts at the time you create it, and it is not affected when you edit the Subscene content.
Subscene levels can be animated like any other animation level, and FX can be assigned to it, affecting all the Subscene content as a whole.
Subscene level cells can be edited, for example to create a cycle, or cut, copied and pasted like any other exposed level (see Working with Xsheet Cells ). Like any other level, if some editing is performed in its frames, all the cells in the main Xsheet/Timeline referring to that Subscene frame will consequently change their content. In case you want to create a copy of a Subscene that refers to the same animation level database, but whose content can be edited independently, you can choose to Clone it.
If you want to reset the editing of a Subscene level, you can Resequence it, by resetting it to the original length and order of its contents.
You can load a scene previously created with Tahoma as a level of the current scene. You can also collapse selected columns/layers to form a new Subscene to better manage the scene, for example you can collapse into a Subscene all the columns/layers used to define a character, or explode a Subscene to automatically bring all of its contents into the Xsheet/Timeline where it is exposed.
As Subscenes can be loaded and saved, they can also be used for importing or exporting sections of an Xsheet/Timeline from one scene to another. For example, if you create a scene where several levels compose a character (head, body, shadow, etc.), you can save it and import it later in a different scene as a Subscene.
When working inside a Subscene, by default only its own contents are displayed in the viewer. If you need to edit the Subscene contents while looking at the whole scene contents, you can activate the Edit in Place mode.
Like standard Xsheets/Timelines, Subscenes can also contain audio files to be used for synchronizing a soundtrack with the animation. However, audio files loaded inside Subscenes are ignored when an output file supporting audio is rendered, because the possibility to edit the Subscene columns/layers frame order could make the resulting soundtrack inconsistent (see Creating a Soundtrack ).
Creating Subscenes
Subscenes are managed by the Scene menu commands, and by buttons in the Quick Toolbar.
You can create a Subscene by collapsing one or several columns/layers where levels are exposed, choosing to include when needed the pegbars to which the columns are linked; or you can cut or copy columns/layers and drawings outside of the Subscene, then paste them inside of it.
Note
The main Xsheet/Timeline will share with its Subscenes the animation level database, so if the same level is exposed in the main Xsheet/Timeline and in one of its Subscenes, the level and its properties will be shared.
When copying Subscene columns/layers and cells, their copies refer always to the same Subscene contents: if changes are made in the Subscene, all the cells in the main Xsheet/Timeline referring to that Subscene will consequently change their content. If you want to create a copy of a Subscene whose contents can be changed independently as concerning internal level exposure, object animation and applied FX, it is possible to Clone it.
Tip
To create a Subscene by collapsing one or several columns:
Select the columns you want to be part of the Subscene in the Xsheet/Timeline or in the Schematic.
Do one of the following:
Choose Scene → Collapse.
Click the Collapse button in the Quick Toolbar.
Right-click any column header and choose Collapse from the menu that opens.
Choose whether to include relevant pegbars in the Subscene or collapse selected columns only, then click the OK button.
Tip
To exit a Subscene:
Do one of the following
Choose Scene → Close Subscene.
Click the Close Subscene button in the Quick Toolbar.
Tip
To open a closed Subscene:
Select the Subscene column in the Xsheet/Timeline, or the Subscene node in the Schematic.
Do one of the following:
Choose Scene → Open Subscene.
Click the Open Subscene button in the Xsheet/Timeline Toolbar.
Right-click the column header and choose Open Subscene from the menu that opens.
Tip
To clone a Subscene:
Select the Xsheet column (or Timeline layer) where the Subscene you want to clone is exposed.
Do one of the following:
Choose Scene → Clone Subscene.
Right-click the column header and choose Clone Subscene from the menu that opens.
Tip
To toggle edit a Subscene in its context:
Do one of the following
Choose Scene → Toggle Edit in Place.
Click the Toggle Edit in Place button in the Xsheet/Timeline Toolbar.
Tip
To resequence a Subscene:
Select the column/layer containing the Subscene.
Do one of the following:
Choose Scene → Resequence.
Right-click the column header and choose Resequence from the menu that opens.
Loading a Scene as a Subscene
Previously saved Tahoma scenes can be loaded in a Xsheet/Timeline as Subscenes.
Every time a scene is loaded as a Subscene, its contents are imported into the current project database according to the project default folders, in the same way as it would be if every single level was imported (see Using the File Browser ).
This allows you to create a library of basic animations that can be loaded and edited in other Xsheets/Timelines to create more complex animations without affecting the original files or drawings. Even when the same Subscene is loaded twice, it is handled as if two different Subscenes were loaded, whose contents and levels can be edited separately.
To keep the database well-ordered you can also activate the Create Sub-folder when Importing Subscene option in the Preferences → Loading dialog, that will automatically create, in the project default folder, a folder named as the Subscene you are importing where the levels from the Subscene will be copied.
Once a Subscene is loaded, its levels are available in the Scene Cast in a sub-folder named as the scene you loaded.
If the camera settings of the scene you are loading as a Subscene are different from those of your current scene, you will be prompted whether to keep the Subscene original camera settings, or to apply the camera settings of the current scene to the Subscene as well.
Note
If the scene you import contains a file whose name is the same of a file already existing in the destination default folder, you will prompted whether to keep the existing file, overwrite it with the new one, or rename it adding a suffix you can decide. In this way you can control if files you are importing were already imported previously, or manage files that share the same name.
Tip
To load a previously saved scene as a Subscene:
Do one of the following:
Choose File → Load Level and use the browser to load a TNZ file.
Choose File → Load As Subscene and use the browser to load a TNZ file.
Use the Tahoma standard browser to drag the scene icon to the Scene Cast pane, the Xsheet/Timeline or the viewer.
In the file browser right-click the scene icon and select Load As Subscene in the menu that opens.
Note
Tahoma scene files can also be loaded by dragging and dropping them from the Windows Explorer or macOS Finder to the Scene Cast, Xsheet/Timeline, or the viewer.
Exploding Subscenes
Subscenes can be exploded to automatically bring their content into the Xsheet/Timeline where they are exposed. When exploding a Subscene it’s possible to choose to bring to the main Xsheet/Timeline, when needed, the pegbars to which columns are linked.
Note
When a Subscene is exploded, its columns/layers and the related FX nodes are displayed as a group in the FX Schematic, in order to better retrieve them (see Using the FX Schematic ).
Note
If FXs are applied to the Subscene column/layer, they will not be applied to the exploded columns, but the disconnected FX nodes will remain as reference in the FX Schematic.
Tip
To explode a Subscene:
Select the Subscene column/layer in the Xsheet/Timeline or in the Schematic.
Do one of the following:
Choose Scene → Explode.
Right-click the Subscene column header and choose Explode from the menu that opens.
Choose whether to bring relevant pegbars to the main Xsheet/Timeline, or to bring columns/layers only, then click the OK button.
Saving a Subscene as a Scene
The content of a Subscene can be saved as a standard scene, i.e. a TNZ file, in order to be loaded as a stand-alone scene or to be available for reuse in other scenes.
The Subscene content will be saved according to the current project settings for default folders, as if you were saving a scene file (see Project Default Folders ).
Tip
To save a Subscene as a scene:
Open the Subscene you want to save, so that its contents are displayed in the Xsheet/Timeline.
Choose Scene → Save Subscene As… and use the browser to save the scene file (see Saving and Loading Scenes ).
Using Memos
Memos can be posted in the Xsheet/Timeline at specific positions in order to add notes and comments to the scene.
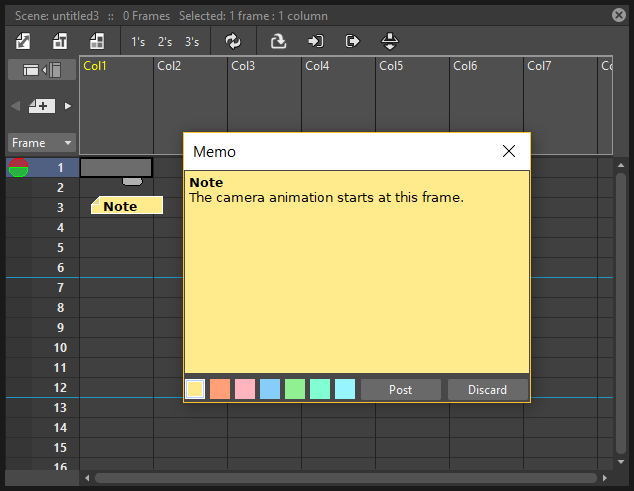
When editing a memo its color can be set, and the text you write can be formatted. Once posted, memos display the first letters of their content in order to be identified, and can be retrieved in the Xsheet/Timeline by navigating them.
Tip
To post a memo:
Click the Add New Memo button at the bottom of the layer header area in the Timeline (or just above the frame number column in the Xsheet).
Type the memo text in the panel that opens, format it and choose the memo color (see below) then click the Post button: the memo is posted at the current frame in the current column.
Click and drag the posted memo to change its position.
Tip
To format the text in the memo:
Select the text you want to format.
Click the arrow (
) displayed on the right of the selection to open the Text Toolbar.
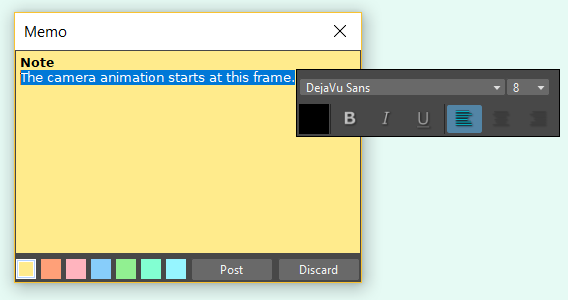
Choose the font family, size, color, style and paragraph alignment by clicking on the relevant menu and buttons in the Text Toolbar.
Tip
To change the memo color:
Choose a color in the palette available at the bottom of the open memo; palette colors can also be selected and edited by using the Style Editor.
Tip
To navigate the memos posted in the Xsheet:
Click the arrow buttons next to the Add New Memo button to check the previous or next memo: the Xsheet/Timeline automatically pans to show where the selected memo is posted.
Tip
To open a memo:
Do one of the following:
Double-click it.
Right-click it and choose Open Memo from the menu that opens.
Tip
To delete a memo:
Do one of the following:
Open it and click the Discard button.
Right-click it and choose Delete Memo from the menu that opens.
Saving and Loading Scenes
When working on a new scene the default name (untitled) followed by a progressive number is assigned to the scene until you save it with a different name. This name is also used in case the $scenepath variable is used in the project settings to store temporarily the material used in the scene.
Note
Untitled scenes and related material are stored in the Tahoma stuff\projects\temp folder, and deleted when the scene is saved with a proper name or not saved at all. Check regularly the temp folder, and if there is some content, delete it to free disk space.
Scene files can be saved and loaded as TNZ files using the related menu commands. Scenes have to be saved in the current project +scenes folder, or any of its sub-folders, in order to retrieve all the material when they are loaded back.
When you use the Save As… command, if the $scenepath is used in the default folders definition, all the material used in the scenes and located in project default folders will be duplicated in folders related to the new scene (see Using the $scenepath Variable in Folder Definition ).
An option Save Automatically allows to save the scene every given number of minutes, and is available in the Preferences → General dialog. If the option is activated, during the saving operation a message is displayed to notify the process.
Note
An asterisk to the right of the scene name in the Viewer and Xsheet/Timeline title bars, denotes that there are unsaved changes for the current scene.
Tip
To work on a new scene:
Choose File → New Scene.
Tip
To save a scene and all its related levels:
Choose File → Save All.
Tip
To save a scene:
Choose File → Save Scene.
Tip
To save the current scene with a different name:
Choose File → Save Scene As…
In the browser that opens select the current project +scenes folder, or any of its sub-folders, where you want to save the scene.
Assign a name to the scene and click the Save button.
Tip
To load a scene from the Load Scene browser:
Choose File → Load Scene…
In the browser that opens retrieve, in the +scenes folder of the current project or any of its sub-folders, the scene you want to load and click the Load button.
Tip
To load a scene from the Tahoma standard browser:
Do one of the following:
Right-click the scene icon and choose Load Scene… from the menu that opens.
Drag and drop the scene icon to the clapboard icon in the scene cast pane.
Note
Scenes can also be loaded by dragging and dropping them from the Windows Explorer or Mac OS Finder to the clapboard icon in the scene cast.
Tip
To load back a recently loaded scene:
Choose File → Open Recent Scene File, then select the scene you want to load from the available submenu.
Tip
To revert the current scene to the last saved version:
Choose File → Revert Scene.
Tip
To automatically save a scene every given number of minutes:
Choose File → Preferences → General.
Activate the Save Automatically option and enter the number of minutes that have to pass between each saving operation.
Choose to activate which file will be saved by this function, either or both of the Scene File and Non-Scene Files.
Importing and Exporting Scenes
In Tahoma each scene file belongs to a specific project, so that the material created and used in the scene is located and can be retrieved from the project default folders.
If you need to copy the scene and the related material to a different project, it is possible either to import any scene file in the current project, or to export it to any other project available in the projectroot (see Setting up Projects ).
Importing Scenes from a Different Project
When trying to load a scene created in a different project, or not located in the current project +scenes folder or any of its sub-folders, you are prompted to decide whether you want to import the scene (Import Scene) or change the current project (Change Project) (see Setting up Projects ).
If you decide to import the scene, the scene will be loaded, and all the scene material will be imported in the following way:
All the files that were located in the original project default folders (i.e. the ones loaded in the scene by using relative paths) will be copied into the related default folders of the current project (see Project Default Folders ).
All the files that were located in external folders (i.e. the ones loaded in the scene by using absolute paths), will remain where they are.
While the material is automatically imported and saved in the current project, the scene file will not be saved until you will save it by using the Save Scene… or Save Scene As… commands.
It is also possible to import one or several scenes into the current project with no need to load and save them by using the Import Scene command.
In this case both the material files located in the original project default folders and the scene file will be copied in the related default folders of the current project.
Note
If the scene you import contains a file whose name is the same as a file already existing in the destination default folder, you will prompted whether to keep the existing file, overwrite it with the new one, or rename it adding a suffix you can decide. In this way you can control if files you are importing were already imported previously, or manage files that share the same name.
Tip
To load and import a scene from a different project:
Load the scene you want to import by using the Load Scene… browser or the Tahoma standard browser.
Choose Import Scene in the dialog that opens: the scene is loaded and the related files will be copied into the default folders of the current project.
Save the scene file in the current project +scenes folder
Tip
To import one or several scenes from a different project, without loading them:
Select the scenes you want to import in the Tahoma standard browser.
Right-click the selection and choose Import Scene from the menu that opens: the scene and the related material files copied in the default folders of the current project.
Exporting Scenes to a Different Project
Scenes can be exported if you need either to copy them from a project to any other existing project, or to copy them to a new project that can be automatically created according to the current project settings.
In both cases the scenes files and the related assets will be automatically collected and copied in the related default folders of the destination project (see Collecting Assets ).
Note
If the scene you export contains any file whose name is the same of a file already existing in the destination default folder, you will prompted whether to keep the existing file, overwrite it with the new one, or rename it adding a suffix you can decide. In this way you can control if files you are exporting were already exported previously, or manage files that share the same name.
Tip
To export one or several scenes to a different project:
Select the scenes you want to export in the Tahoma standard browser.
Right-click the selection and choose Export Scene… from the menu that opens: the Export Scene dialog opens.
In the dialog do one of the following:
Select the Choose Existing Project option if you want to export the selected scenes to an existing project, then navigate the folder tree to choose the destination project.
Choose the Create New Project option if you want to export the selected scenes to a new project based on the current one, then assign a name for the new project.
Click the Export button.
Collecting Assets
Files used in a scene can be located in the default folders of the current project, or loaded from an external folder (see Project Default Folders and Using the File Browser ).
This means that when a project has to change location for any reason (e.g. for a backup), moving all the default folders does not grant that all the files required for the project scenes are moved along, because files loaded from external folders will remain where they are.
For this reason it’s possible to collect all the files used in a scene, thus importing automatically to the project default folders all the files that were not imported at loading time. At the same time the scene file for which you are collecting assets will be automatically updated in order to correct all the loading paths of the newly imported files to keep consistency.
Tip
To collect the assets of one or several scenes:
Select the scenes for which you want to collect assets.
Right-click the selection and choose Collect Assets from the menu that opens: all the scene files that were located in external folders are copied into the default folders of the project, and the related paths used in the scene files are updated.
Scene Backup Files
When scenes are saved, backup files of previous versions are automatically stored in a folder named as the scene, that is located in +scenes\backups of the current project.
The four previous scene versions are retained, and they are named as the scene, with a progressive backup number: the highest the number, the more recent the backup.
For example if you have saved seven times the scene named my_scene, 4 backup versions of the scene named my_scene_3 , my_scene_4 , my_scene_5 and my_scene_6 are available in the +scenes\backups\my_scene folder.
If you want to recover a scene backup version of a scene, you have to remove the backup number so to have the correct scene name, and move the file into the +scenes folder.
Tip
To recover a backup version of a scene:
Retrieve in +scenesbackups the folder named as the scene whose backup you want to recover.
In the folder, retrieve the TNZ file related to the latest backup you want to recover, and rename it, removing the backup number so to have the correct scene name.
Copy and paste it into the +scenes folder to replace the version you want to scratch.
Printing Xsheets
An Xsheet can be saved as HTML file in order to view it on any computer by using an Internet browser, and to print it on paper.
The HTML file contains a header with general information, several tables, whose length and width you can decide, representing the Xsheet with exposed levels and objects movements, and a list of the levels exposed in the Xsheet with the related location on disk.
If any Subscenes are used in the scene, they are displayed after the main Xsheet where they are exposed.
The information displayed in the header and the appearance of the HTML table can be set by editing the following files located in the folder Tahoma stuff\profiles\layouts\settings :
xsheet_html.xmlcontains the information used for the HTML Xsheet header, and the size for the tables used to represent the Xsheet content.xsheet.cssis a Cascading Style Sheet file that is used to define the colors, layout, and other aspects of the HTML Xsheet file (see below ).
When using the Print Xsheet command, a dialog with information about the location and name of the generated HTML file is displayed; then the generated HTML file is displayed in your default browser.
The HTML file is saved in the same location as the TNZ file; the CSS file used for its formatting is generated as well, by copying the one located in the folder Tahoma stuff\profiles\layouts\settings . If a CSS file is already available in the location where the HTML Xsheet file is saved, it will be used instead of generating a new one.
Note
If you want to move the HTML Xsheet file, you should move the CSS file as well, in order to preserve the HTML file appearance as defined by the CSS file.
Editing the HTML Xsheet Header and Table Size
The HTML Xsheet header and the size for the tables used to represent the Xsheet content can be defined by editing the`` xsheet_html.xml`` file available in the folder Tahoma stuff\profiles\layouts\settings . It can be edited with any text editor software, e.g. Notepad or TextEdit.
The whole text is included in the tag xsheet_html , that contains the elements page and info , where the different users and roles are defined.
The basic structure of the file is the following:
<xsheet_html>
   <page rows="50">
   <page columns="10">
   <info name="Company" value="Company name"/>
   <info name="Name" value="Value"/>
</xsheet_html>
By editing the page row and page columns values you can set the size of the table used for splitting the Xsheet in sections. The size of the table allows you to fit each Xsheet section to the paper size you want to use to print the Xsheet on paper.
The info lines allows you to set information to be displayed in the header, for example the production name.
In the example file you can find the following lines:
<info name="Company" value="Company name"/>
<info name="Name" value="Value"/>
These lines can be edited, and new lines, with the same syntax, can be appended, to provide all the information you want to appear in the header of the HTML Xsheet file.
Note
By default the header contains the Project and Scene names and the number of frames the scene consists of; this information cannot be edited, as they are retrieved automatically from the scene file.
Note
The xsheet_html.xml file has to be well-formed, and so it can not contain an opening tag without its related closing tag, otherwise Tahoma will not run. If you decide to edit the xsheet_html.xml file, make a backup copy first in case you need to revert the file to the original version.
Tip
To edit the xsheet_html.xml file:
Open the xsheet_html.xml file available in the folder Tahoma stuff\profiles\layouts\settings with a text editor application (e.g. Notepad or TextEdit).
Tip
To change the size of the table used for splitting the Xsheet in sections:
Change the page row and page columns values in the xsheet_html.xml file.
Tip
To edit the information displayed in the header:
Edit the info lines available in the xsheet_html.xml file, and append new ones if needed.
Tip
To check if the xsheet_html.xml file is well-formed:
Open it with an Internet browser and check if all the elements are displayed in a nested list where they can be opened and closed to display or hide the related contents.
Editing HTML Xsheet Appearance
The HTML Xsheet appearance can be defined by editing thexsheet.css file available in the folder Tahoma stuff\profiles\layouts\settings .
The xsheet.css is a Cascading Style Sheet file that is used to define the colors, layout, and other aspects of the HTML Xsheet file. It can be edited with any text editor software, e.g. Notepad or TextEdit.
Editing the CSS file requires some skill in the CSS language, but some changes like table ruling thickness, or cell colors, can be easily done by expressing the thickness in pixels and colors as an RGB triplet in hexadecimal format.
Elements defined in the CSS are the following:
headerrefers to the table used as header in the HTML Xsheet file.tablerefers to the table used for displaying the Xsheet sections.THrefers to the header cells of the tables.first_numericrefers to the first numerical column of the Xsheet tables.fxcellrefers to the table cells belonging to special FX columns.subxsheetcellrefers to the table cells belonging to Subscene columns.TDrefers to the generic table cells.TH.framerefers to the frame columnTD.levelcellrefers to the table cells belonging to standard level columns.
Note
The CSS files have to be written according to a specific syntax. If you decide to edit the xsheet.css file, make a backup copy first in case you need to revert the file to the original version.
Tip
To edit the xsheet.css file:
Open the xsheet.css file available in the folder Tahoma stuff\profiles\layouts\settings with a text editor application (e.g. Notepad or TextEdit).